Please follow the 19c grid installation guide below for the grid software installation:
Table of Contents
1. Download the grid software from Oracle Database 19c Grid Infrastructure (19.3) for Linux x86-64
2. Once the 19c grid software download is completed, Place the software in the shared location of your Windows machine.If you do not know how to create a shared folder then follow my article Create Shared Folder.


3. log in to Putty or MobaXterm and log in to your server as a grid user. After that go to the shared folder location of your Linux machine and unzip the grid software.
[grid@node1 ~]$ cd /media/sf_Linux
[grid@node1 sf_Linux]$ ls -ltr
total 2821496
-rwxrwx--- 1 root vboxsf      20684 Mar  3 08:51 oracleasmlib-2.0.15-1.el7.x86_64.rpm
-rwxrwx--- 1 root vboxsf 2889184573 Mar  9 22:06 LINUX.X64_193000_grid_home.zip

[grid@node1 sf_Linux]$ unzip LINUX.X64_193000_grid_home.zip -d /u01/app/19.3.0/grid/
4. Install the RPMs for cluvfy as root:
[root@node1 ~]# cd /u01/app/19.3.0/grid/cv/rpm

[root@node1 rpm]# ls -lrt
total 12
-rw-r--r-- 1 grid oinstall 11412 Mar 13  2019 cvuqdisk-1.0.10-1.rpm

[root@node1 rpm]# rpm -Uvh cvuqdisk-1.0.10-1.rpm
Preparing...                          ################################# [100%]
Using default group oinstall to install package
Updating / installing...
   1:cvuqdisk-1.0.10-1                ################################# [100%]
5. If you are installing the grid software for the RAC environment, then copy the cvuqdisk-1.0.10-1.rpm from node1 to node2 server as we have only extracted the software in node1 otherwise skip this step.
[grid@node1 ~]$ scp /u01/app/19.3.0/grid/cv/rpm/cvuqdisk-1.0.10-1.rpm grid@node2:/home/grid/cvuqdisk-1.0.10-1.rpm                                                                                                      100%   11KB   1.7MB/s   00:00

[root@node2 ~]# cd /home/grid
[root@node2 grid]# ls -ltr
total 12
-rw-r--r-- 1 grid oinstall 11412 Mar 10 01:32 cvuqdisk-1.0.10-1.rpm

[root@node2 grid]# rpm -Uvh cvuqdisk-1.0.10-1.rpm
Preparing...                          ################################# [100%]
Using default group oinstall to install package
Updating / installing...
   1:cvuqdisk-1.0.10-1                ################################# [100%]
6. Passwordless ssh setup for grid user so that grid user can log in to the other nodes without any password:
[grid@node1 grid]$ cd /u01/app/19.3.0/grid/deinstall

[grid@node1 deinstall]$ ./sshUserSetup.sh -user grid -hosts "node1 node2" -noPromptPassphrase -confirm -advanced

The output of this script is also logged into /tmp/sshUserSetup_2024-02-16-21-40-17.log
-Verification from complete-   ------->You will get this message
SSH verification complete.
7. Run Cluster verification utility as grid user:
[grid@node1 ~]$ cd /u01/app/19.3.0/grid/
[grid@node1 grid]$ ls -lrt runcluvfy.sh
total 108
-rwxr-x---  1 grid oinstall   628 Sep  4  2015 runcluvfy.sh

[grid@node1 grid]$ ./runcluvfy.sh stage -pre crsinst -n node1,node2  -orainv oinstall  -osdba dba -verbose
If any RPMs fail, then you have to install the same from Oracle Linux 7 Repositories. Ignore the other errors and proceed with the next steps.
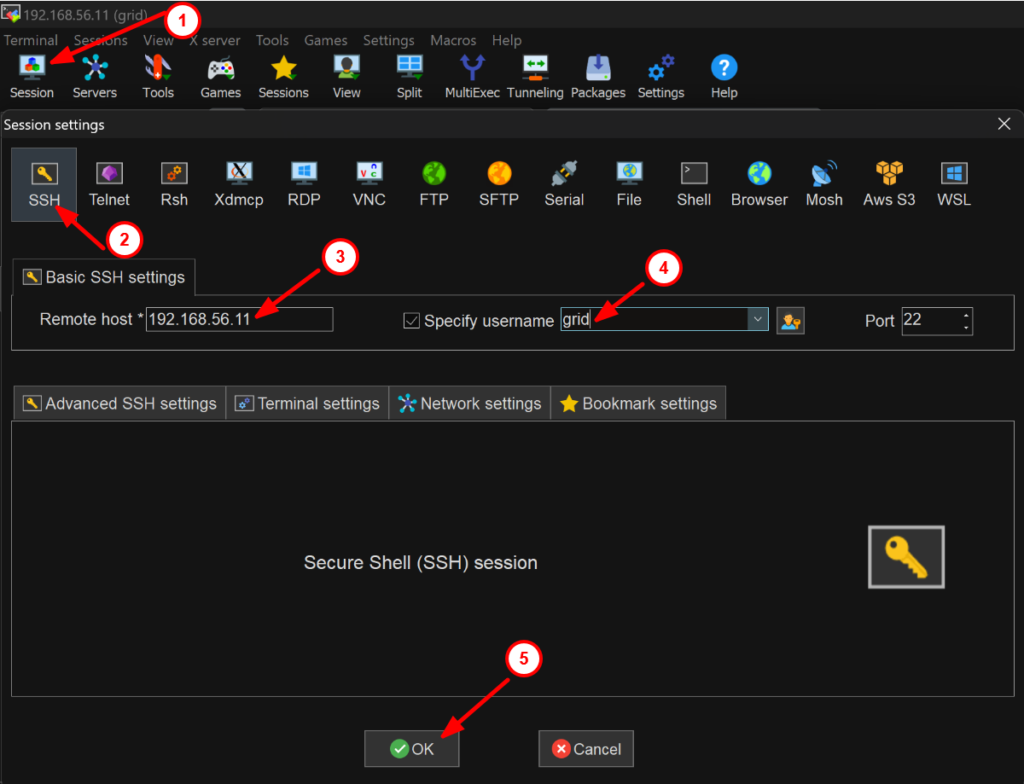
8. Open MobaXterm and run the gridSetup script to follow the 19c grid installation step-by-step guide.

[grid@node1 ~]$ cd /u01/app/19.3.0/grid
[grid@node1 grid]$ ls -ltr gridSetup.sh
-rwxr-x--- 1 grid oinstall 3294 Mar  8  2017 gridSetup.sh
[grid@node1 grid]$ ./gridSetup.sh
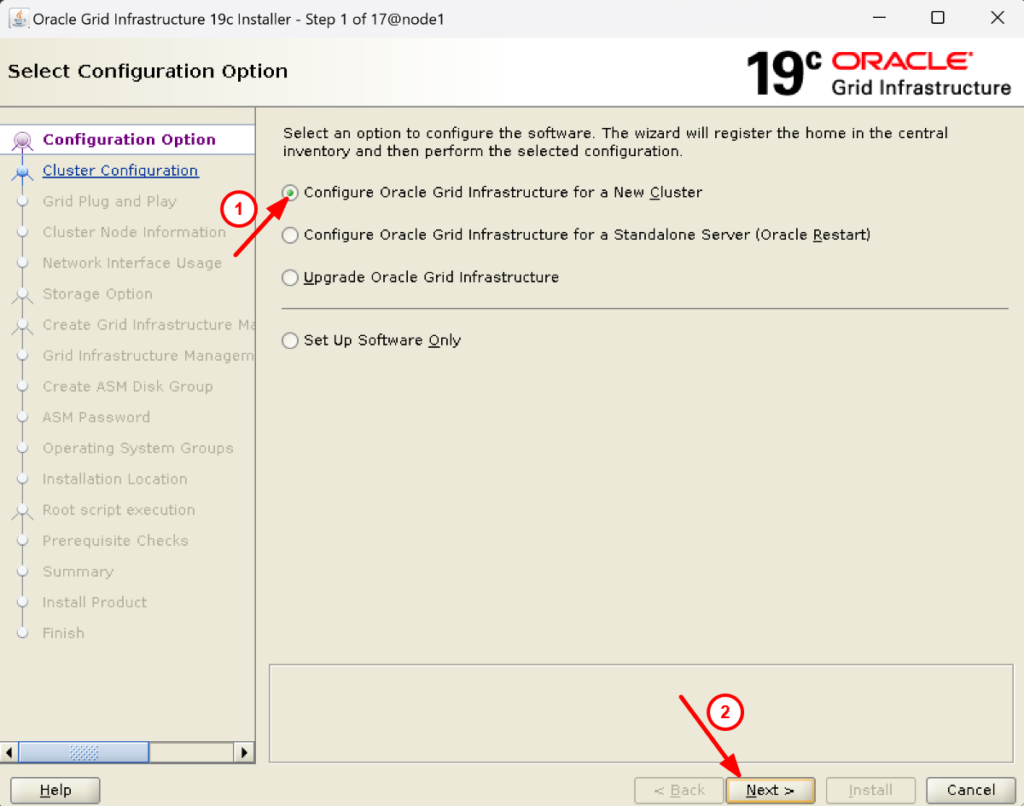
9. It will open a new GUI window. Select Configure Oracle grid infrastructure for a new cluster and click on Next:

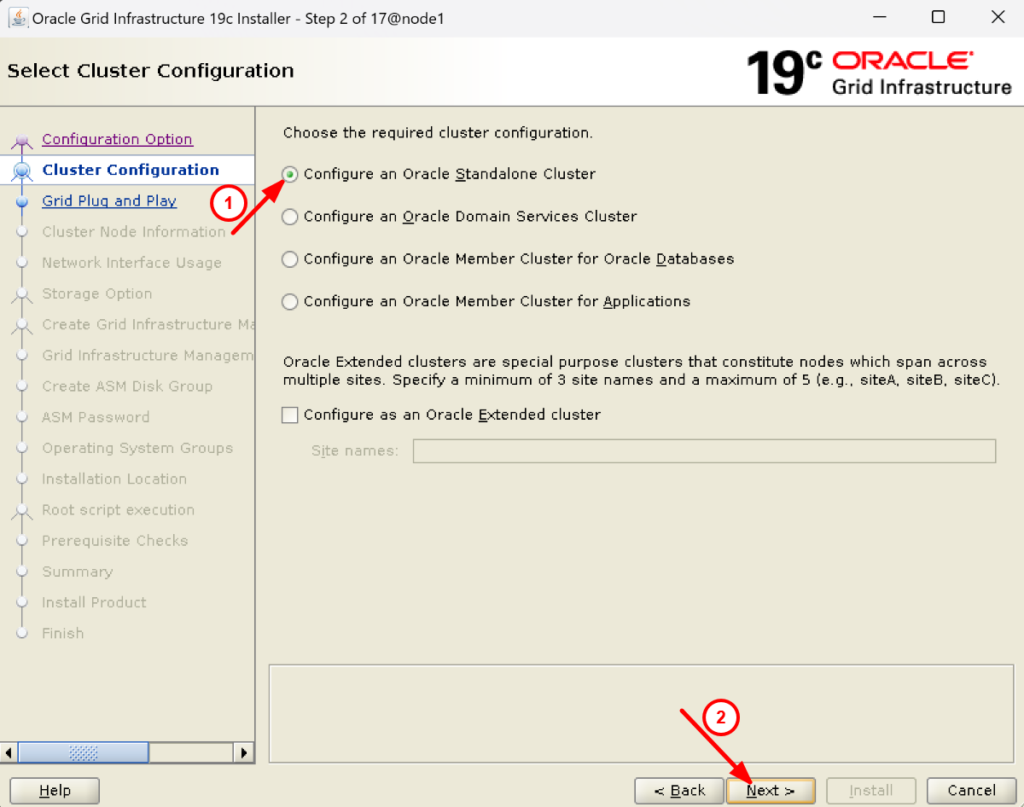
10. Select configure oracle standalone cluster and click on next:

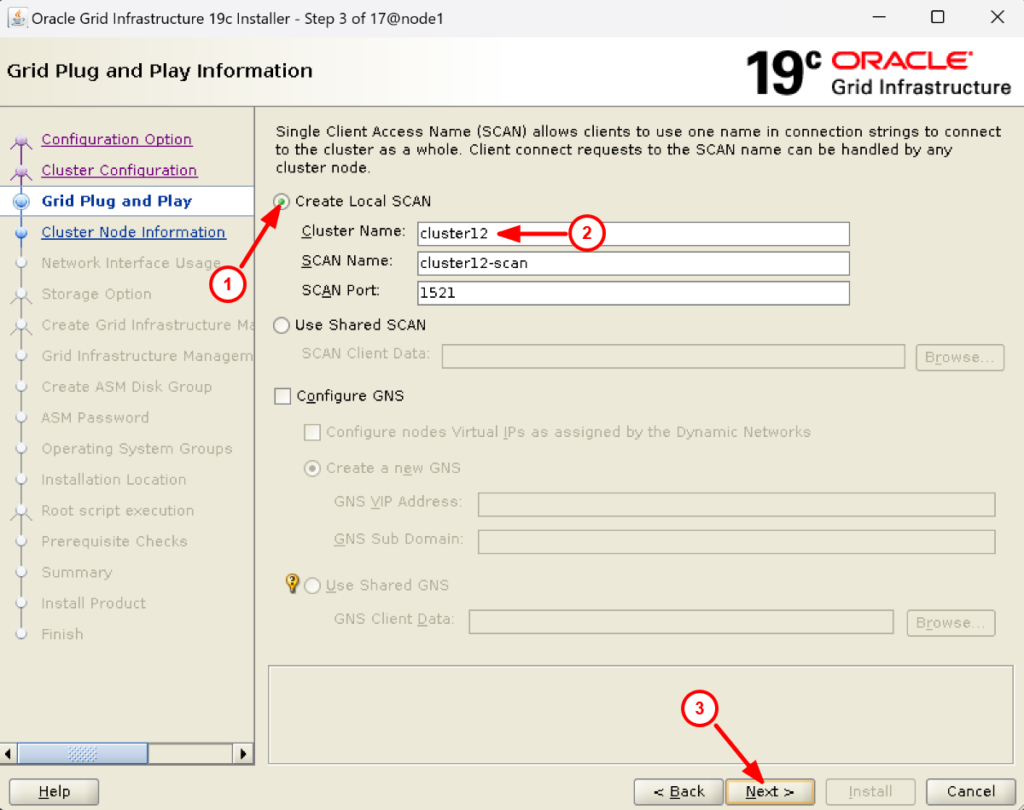
11. Provide the cluster and it will automatically create a scan name (Here cluster12). Click on next to proceed:

12. Select the node1 to edit and provide the public as well as virtual hostname:
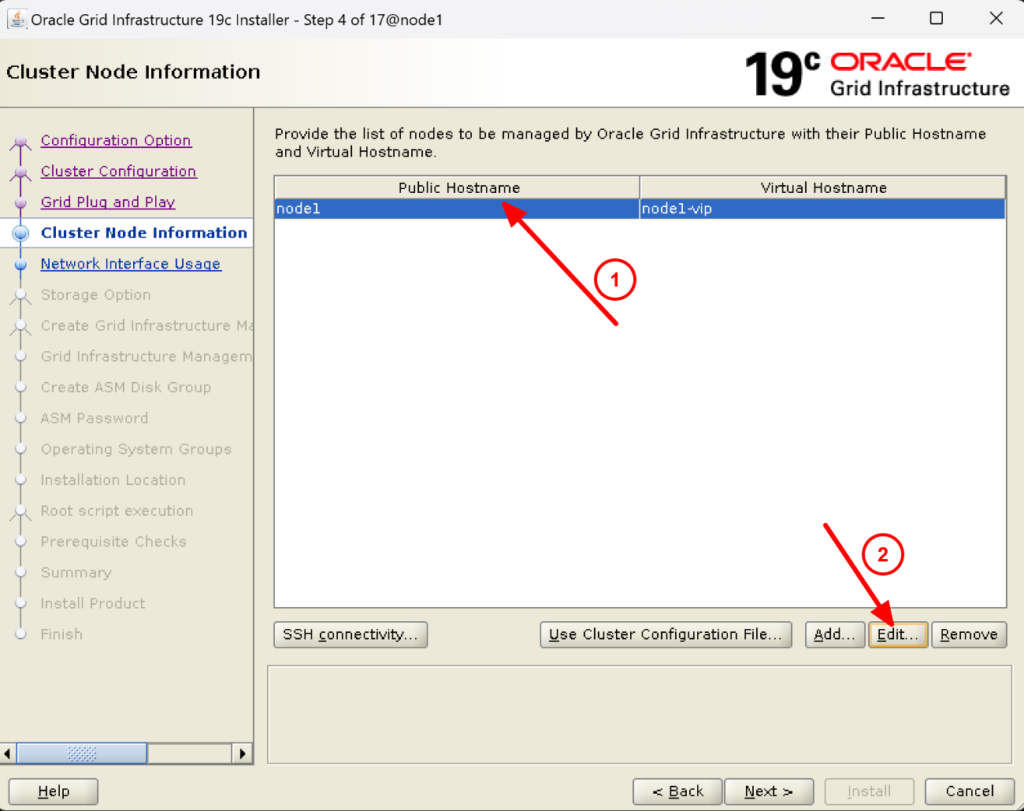

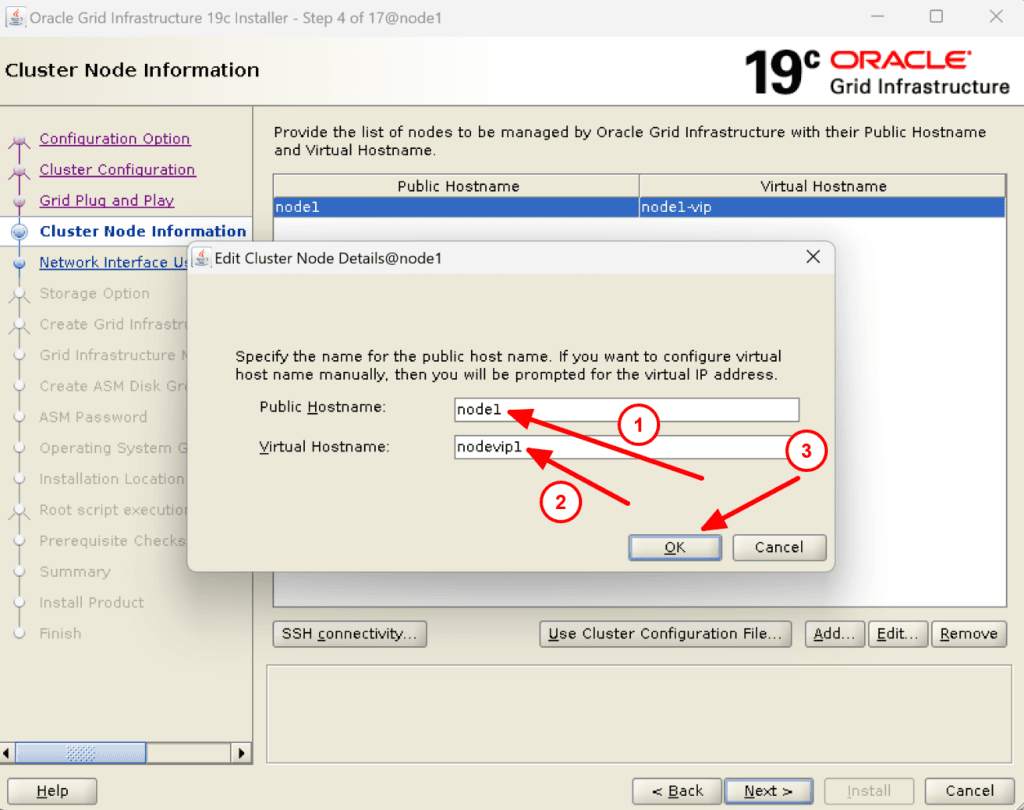

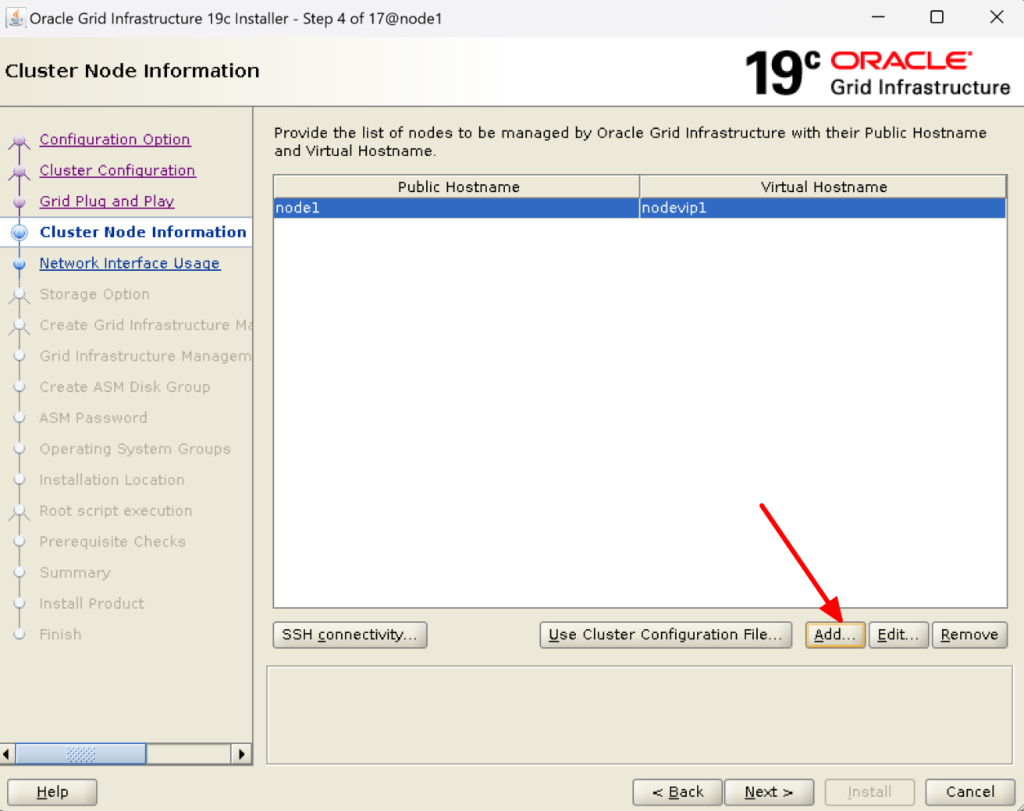
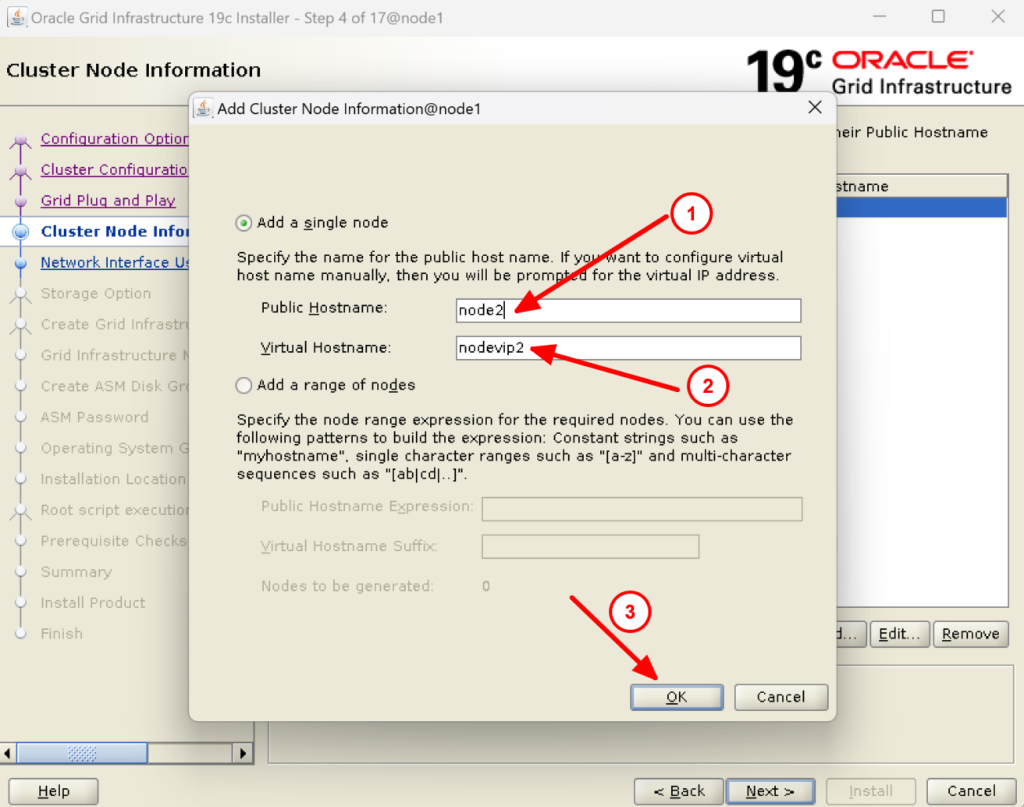
13. Click on Add to add the 2nd node and provide the public and virtual hostname:


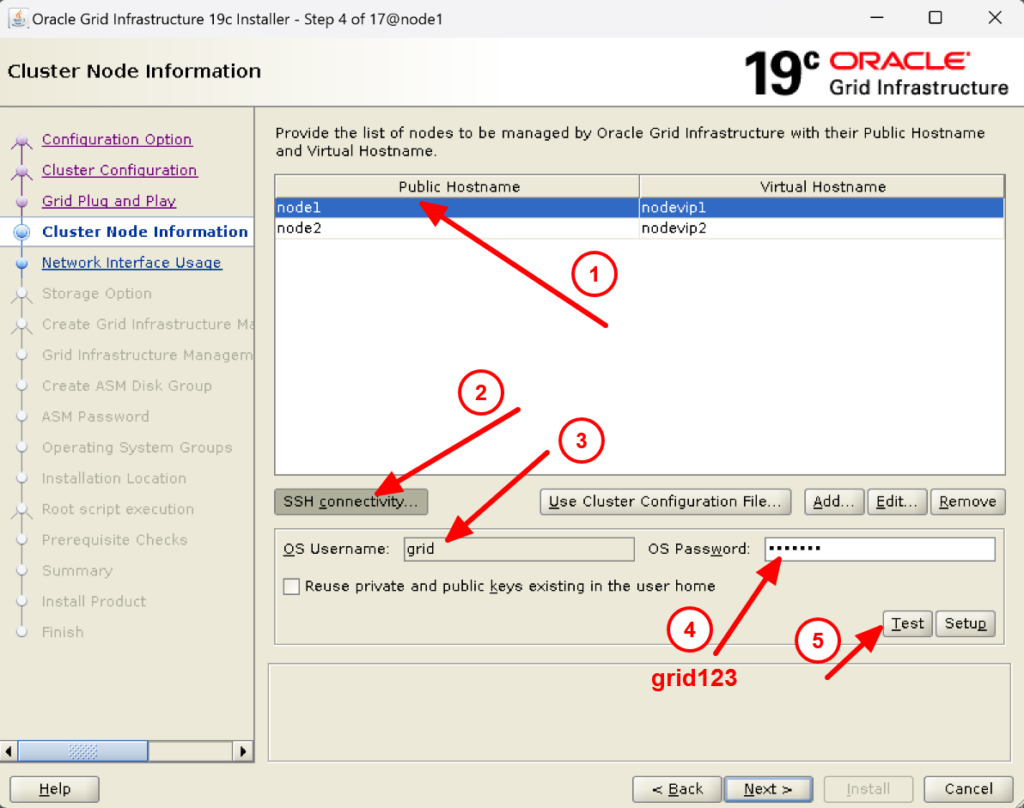
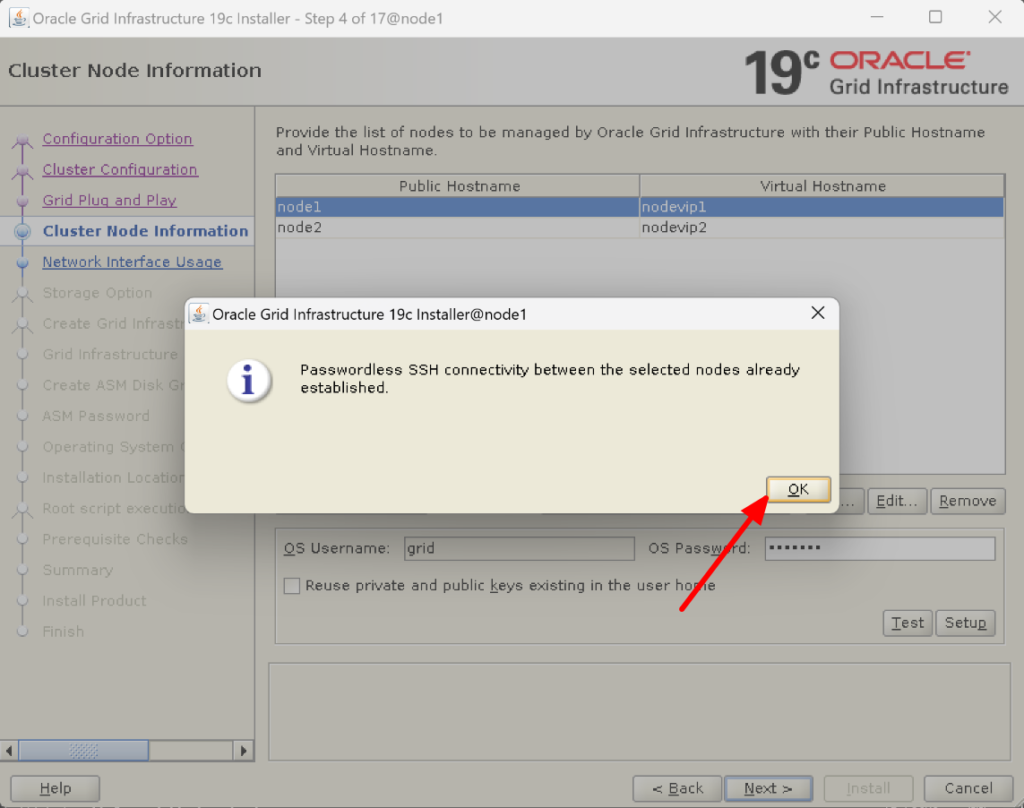
14. Now we have to check SSH connectivity between the nodes node1 and node2.To do that select any node, click on SSH connectivity, provide the grid user password, and click on test. You will receive a message that the grid setup between the selected nodes is already established as we already have done in step 6. If you have not done so, you can click on setup to set it up.


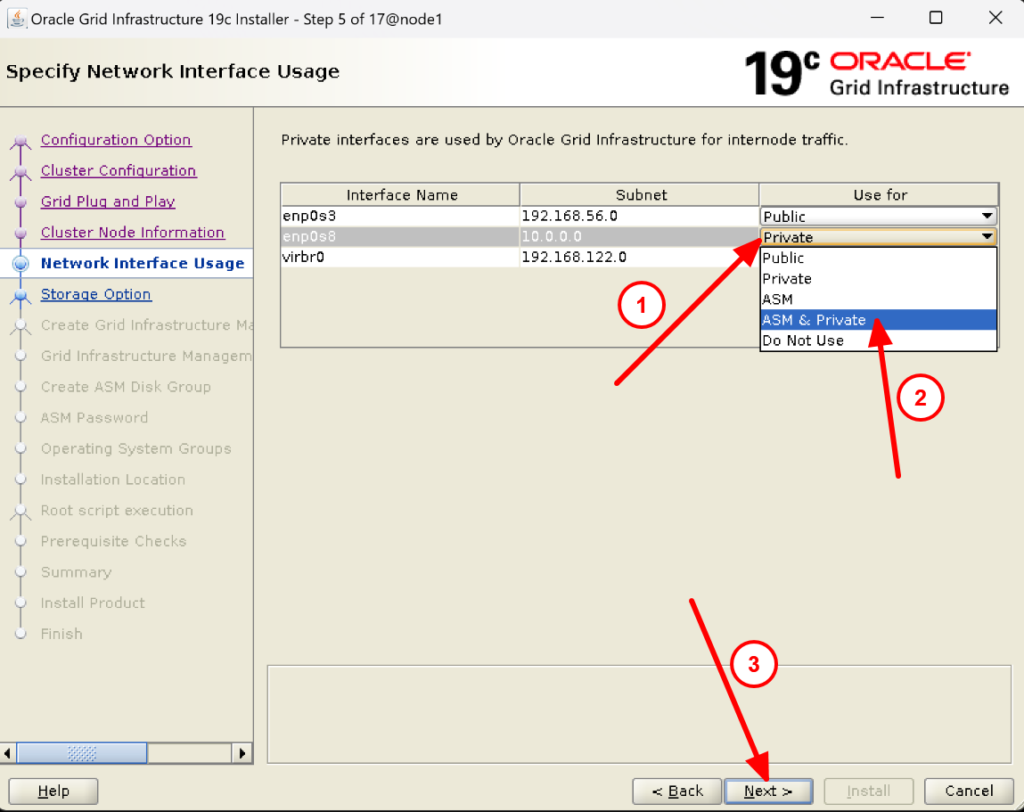
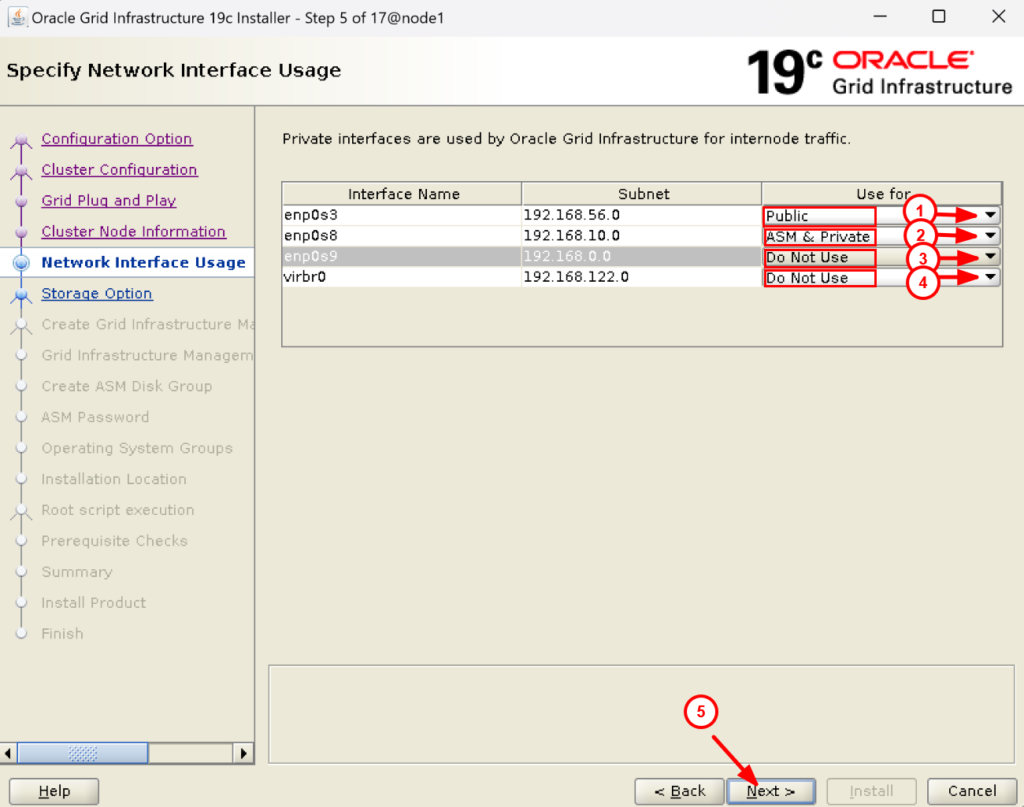
15. Change the Interface enp0s8 used for ASM & Private from Private and click on next:


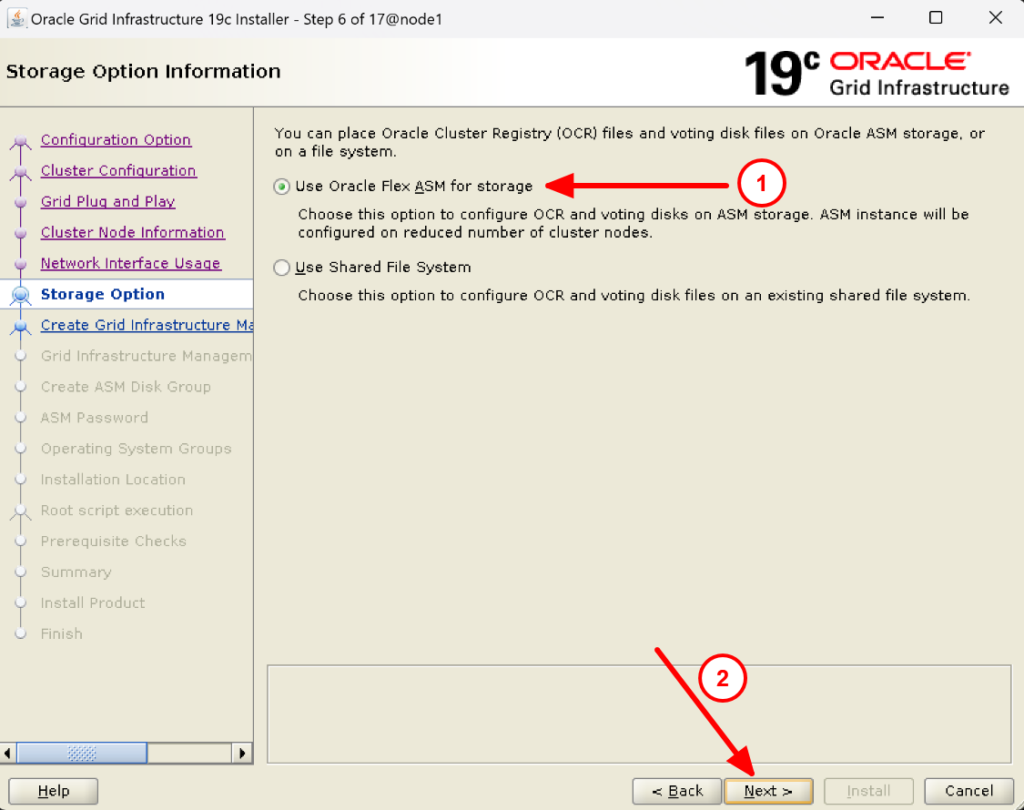
16. Select Oracle Flex ASM for storage and click on next:

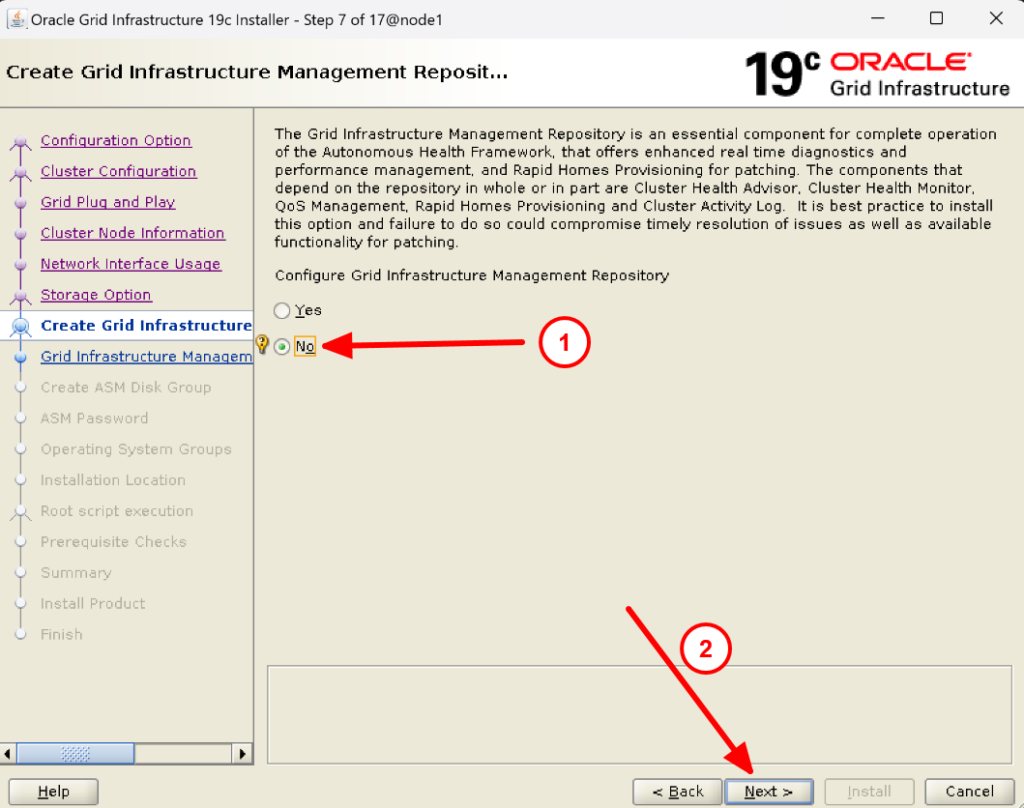
17. Select No for Grid Infrastructure Management Repository configuration and click on next:

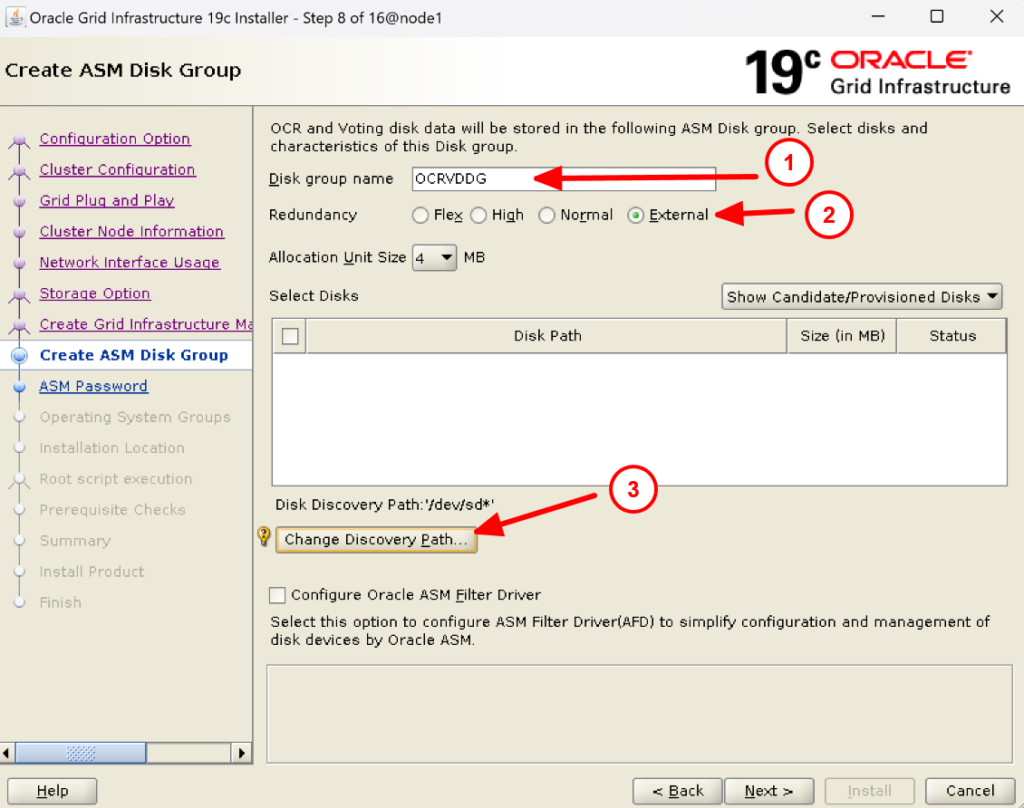
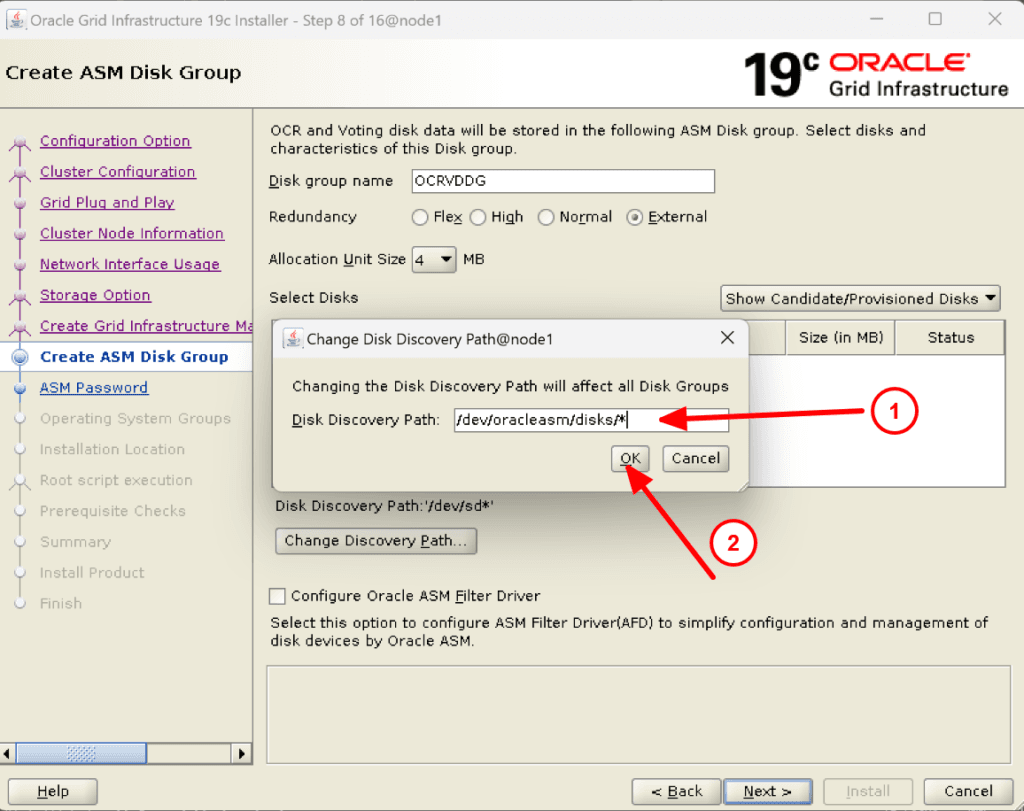
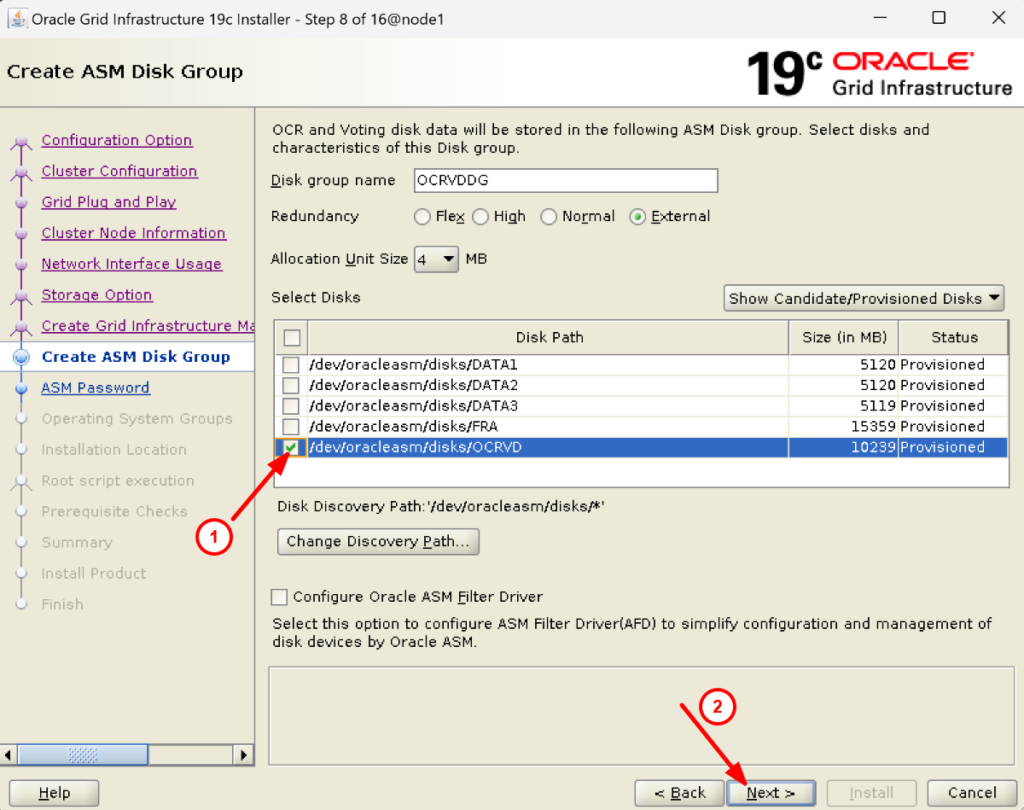
18. Provide a disk group name for OCR & Voting Disk and select external redundancy. After that change the discovery path to /dev/oracleasm/disks/* and select disk OCRVD that we created earlier.



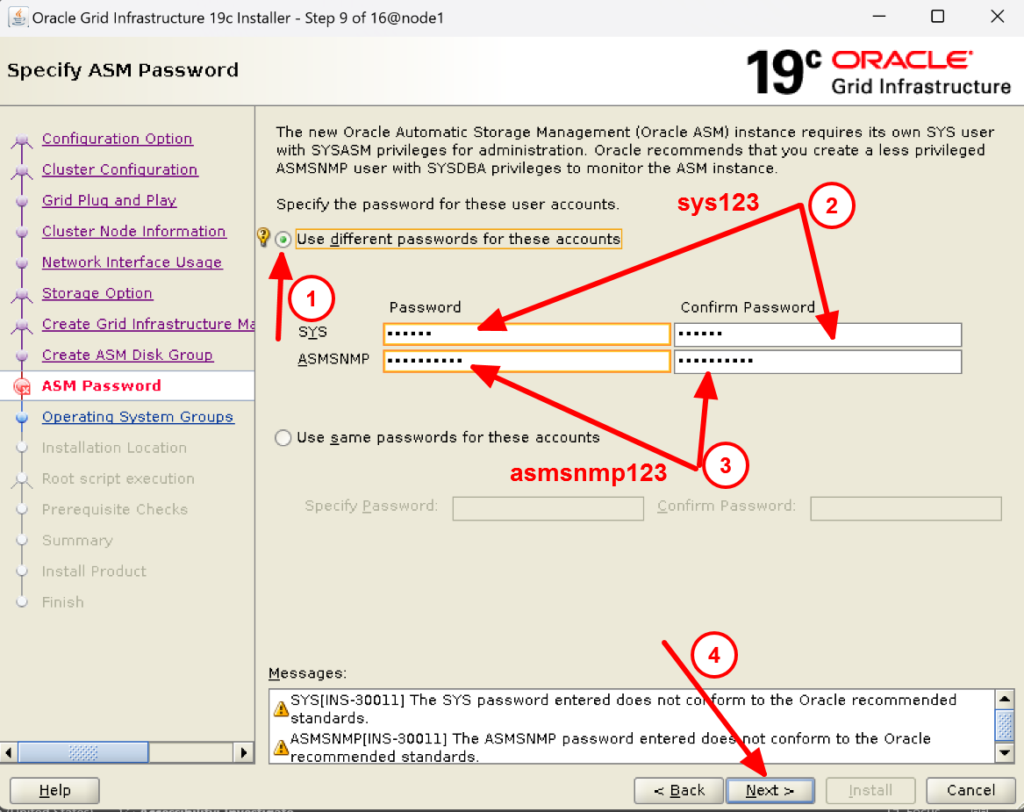
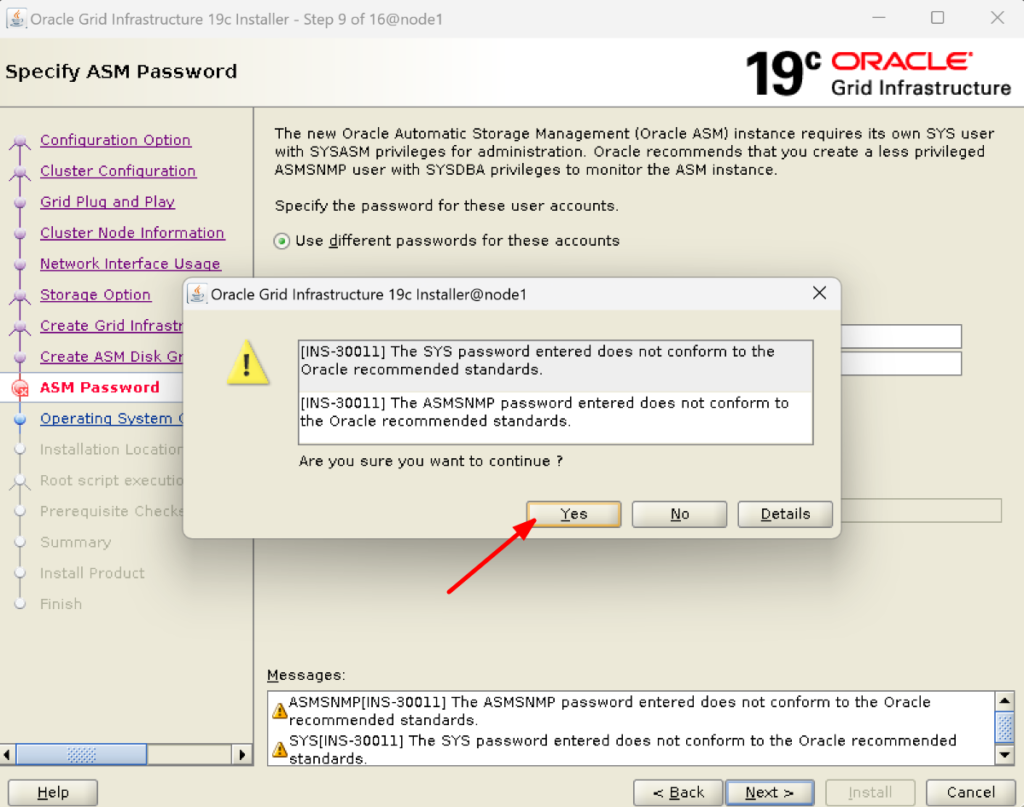
19. Now provide the password for SYS and ASMSNMP users. Ignore the warning messages.


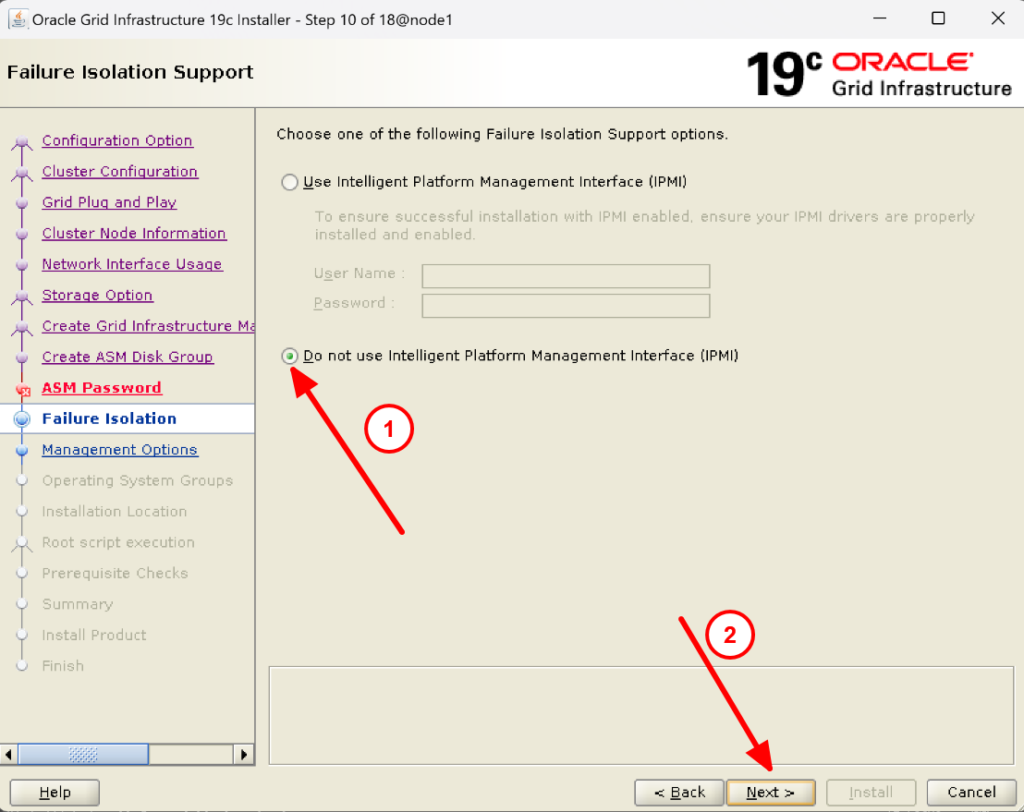
20. Do not use IPMI and click on next:

21. We are not registering with Enterprise Manager Cloud Control as of now.
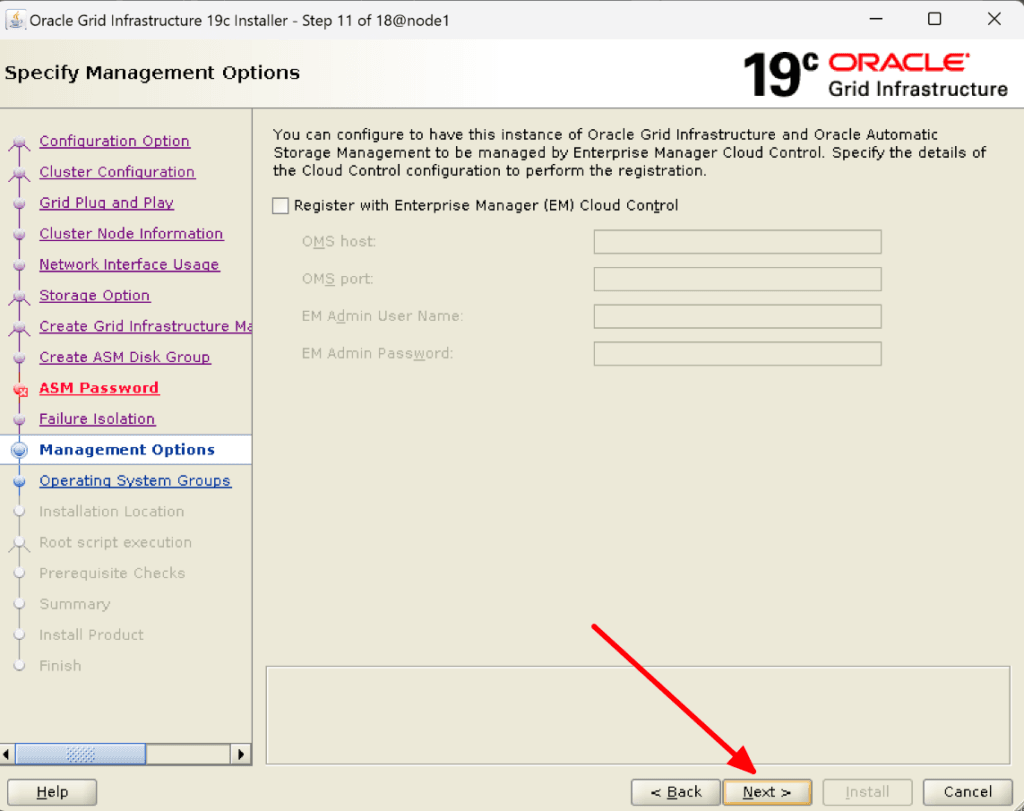

22. Click on Next:
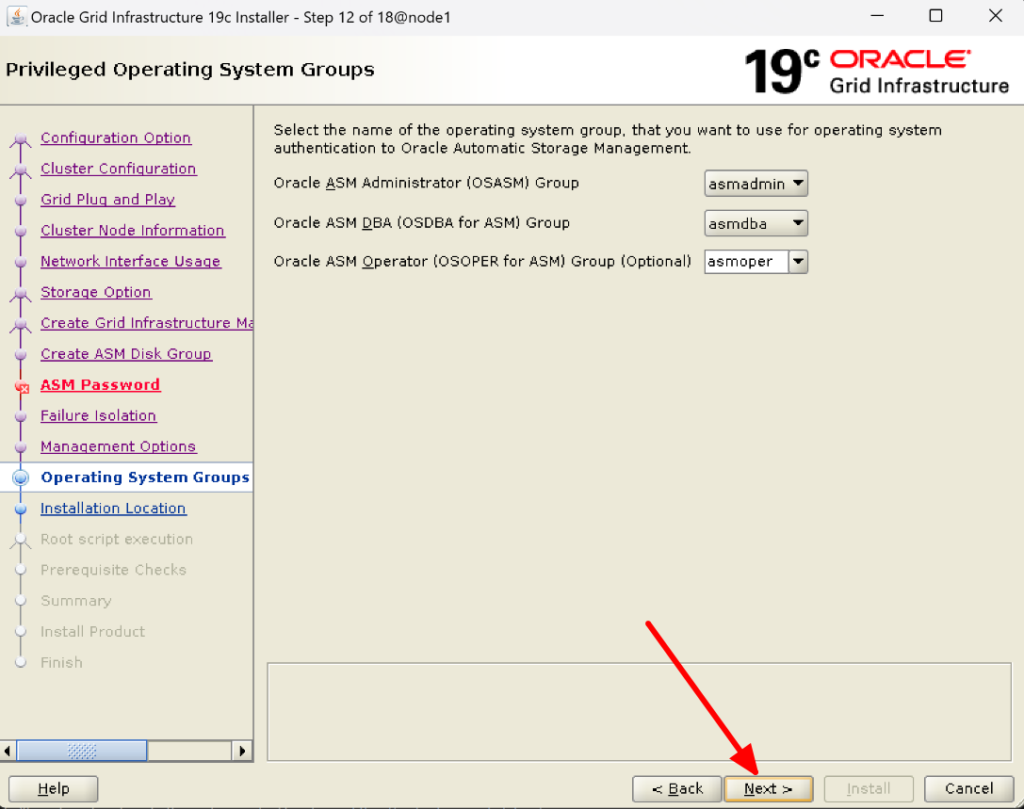

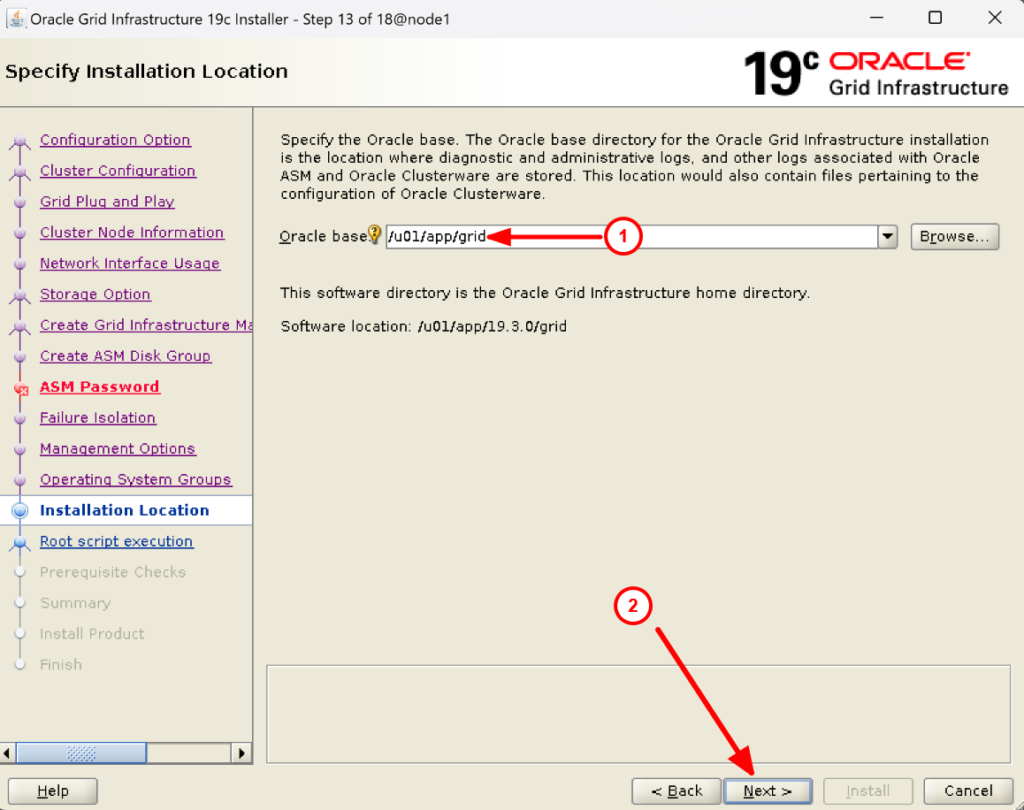
23. Provide the Oracle Base (/u01/app/grid) for the grid user and click on next:

24. Check the inventory location and proceed:
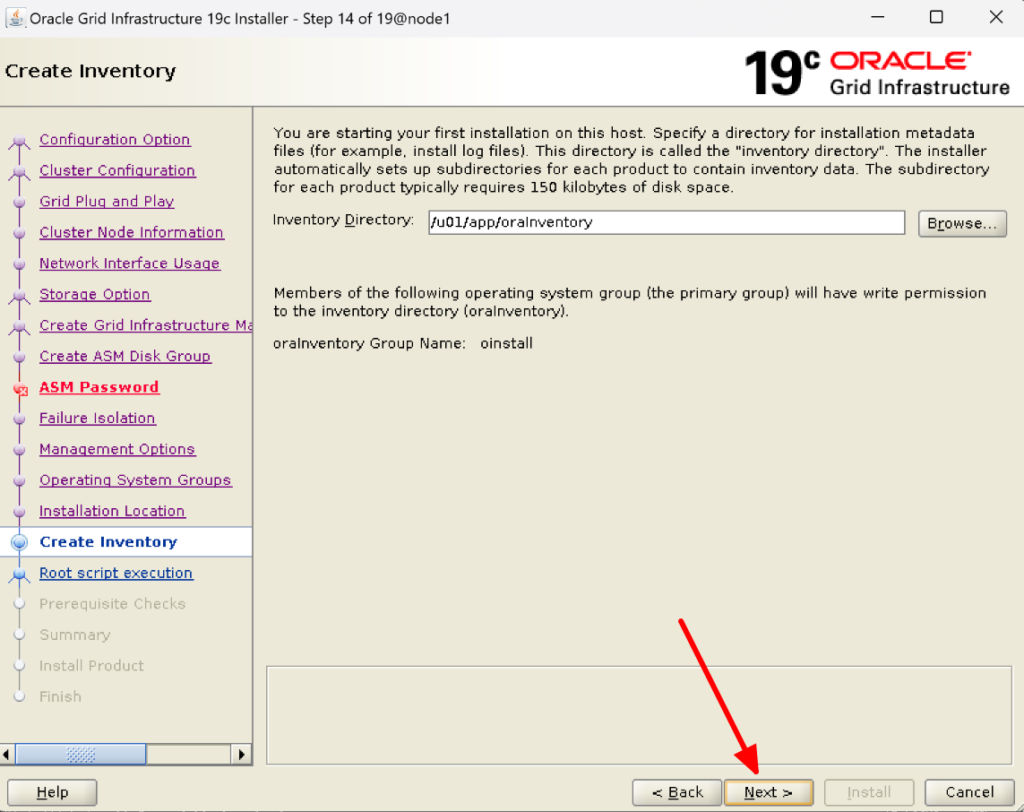

25. Click on Next:
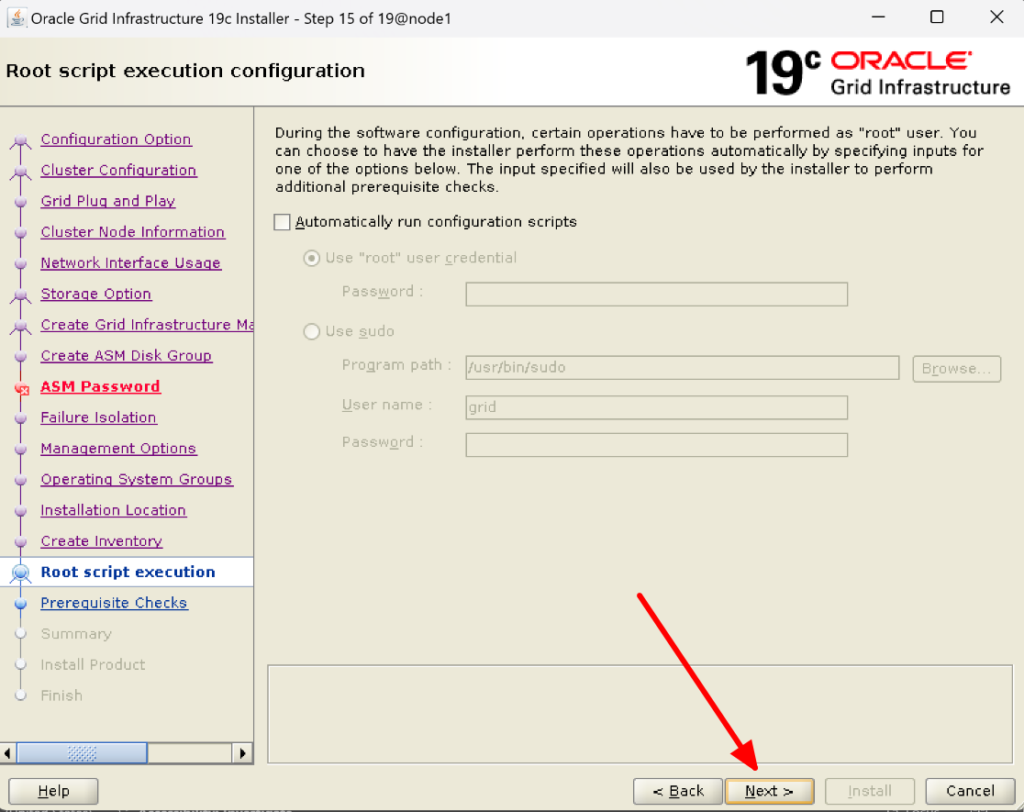

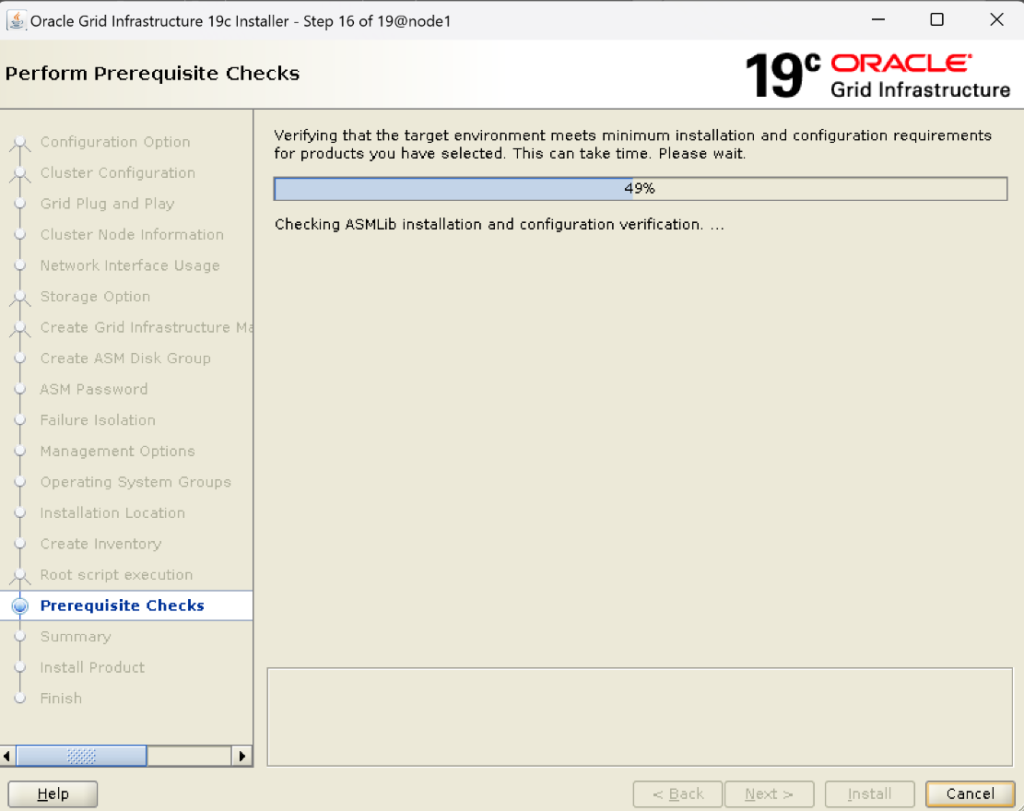

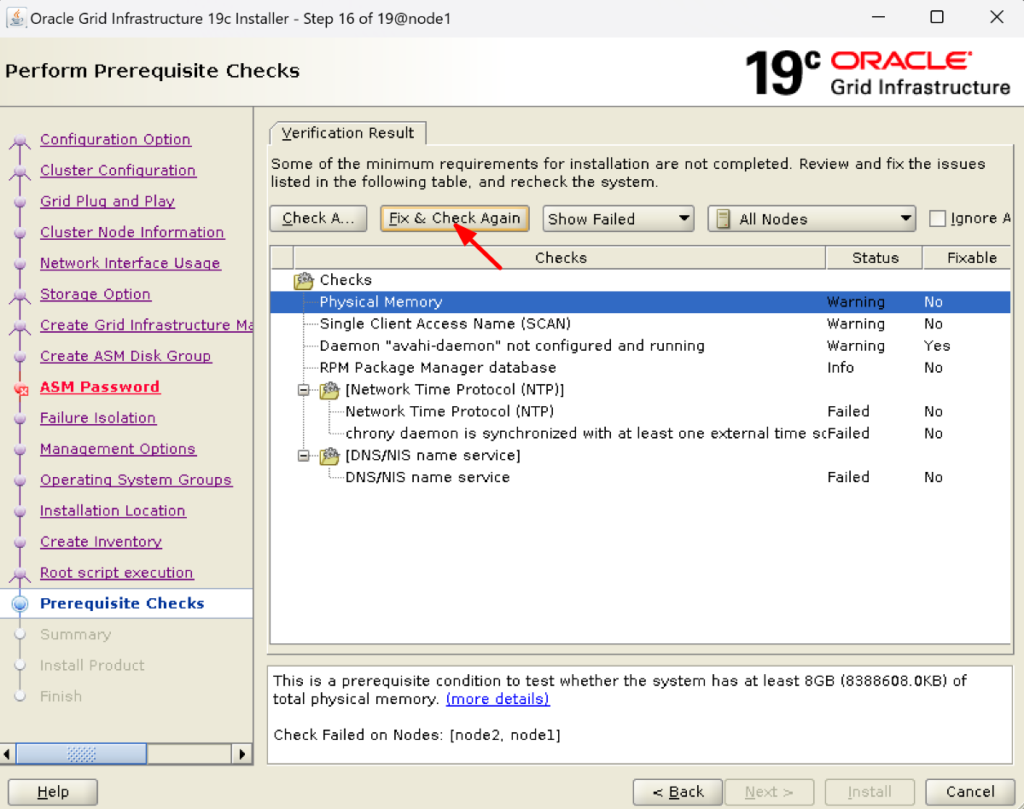
26. Now check if is there anything fixable in the last column then click on Fix & Check Again. It will ask you to run a fixup script in both nodes.

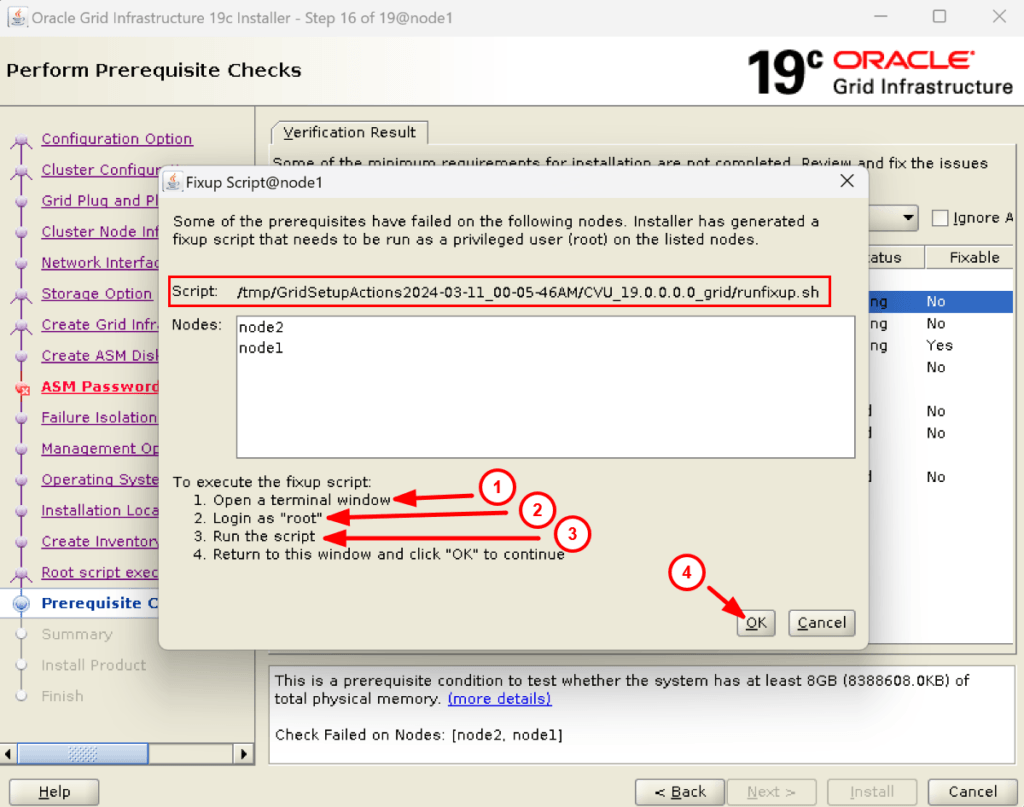

[root@node1 ~]# /tmp/GridSetupActions2024-02-16_11-23-22PM/CVU_19.0.0.0.0_grid/runfixup.sh
All Fix-up operations were completed successfully.

[root@node2 ~]# /tmp/GridSetupActions2024-02-16_11-23-22PM/CVU_19.0.0.0.0_grid/runfixup.sh
All Fix-up operations were completed successfully.
27. Once done click on check again. You will see there is nothing in the Fixable section.
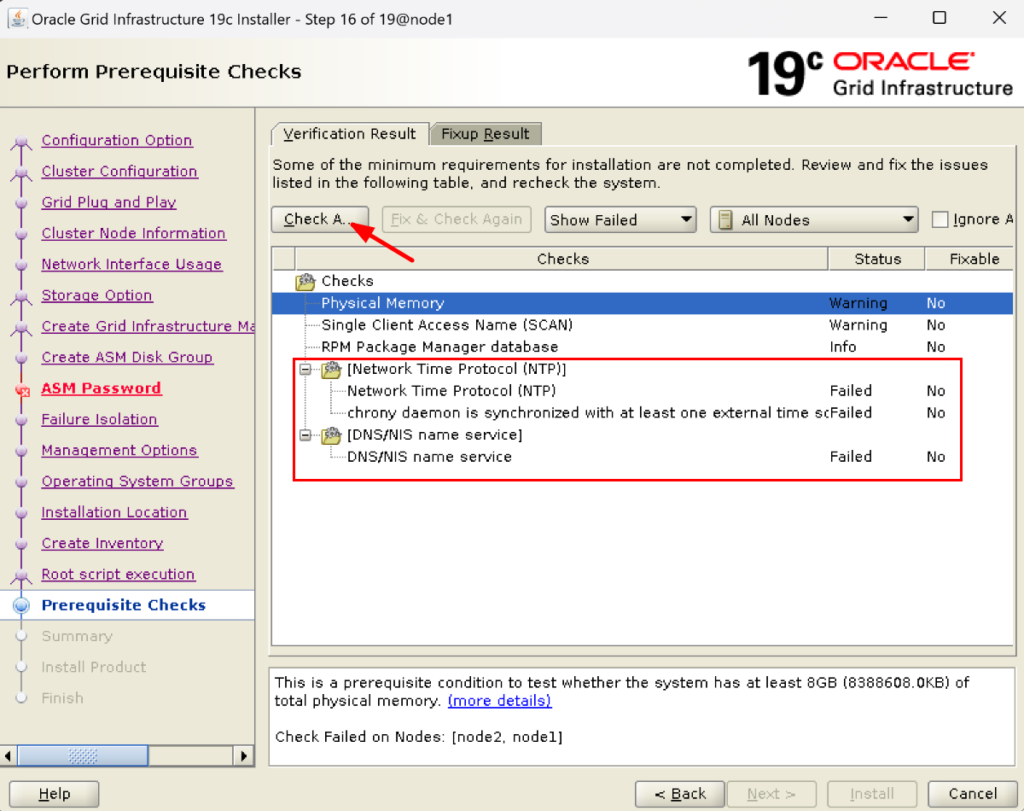

28. Here we can see NTP and DNS/NIS failed but we can ignore them by clicking on the Ignore All box:
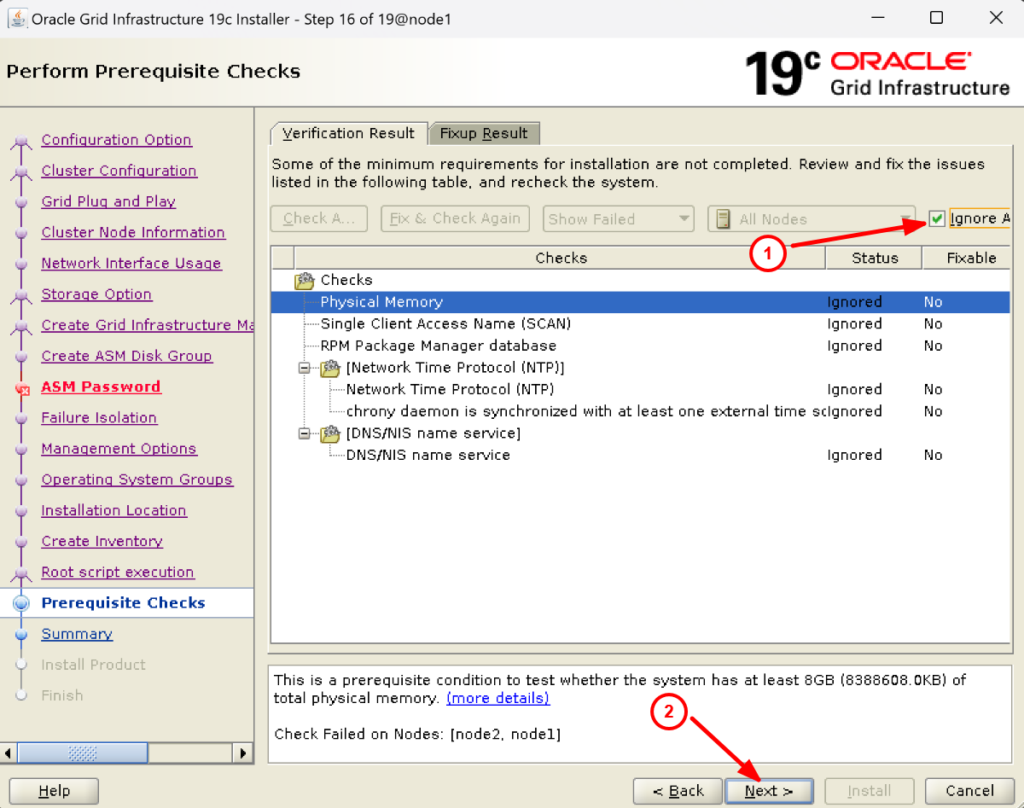

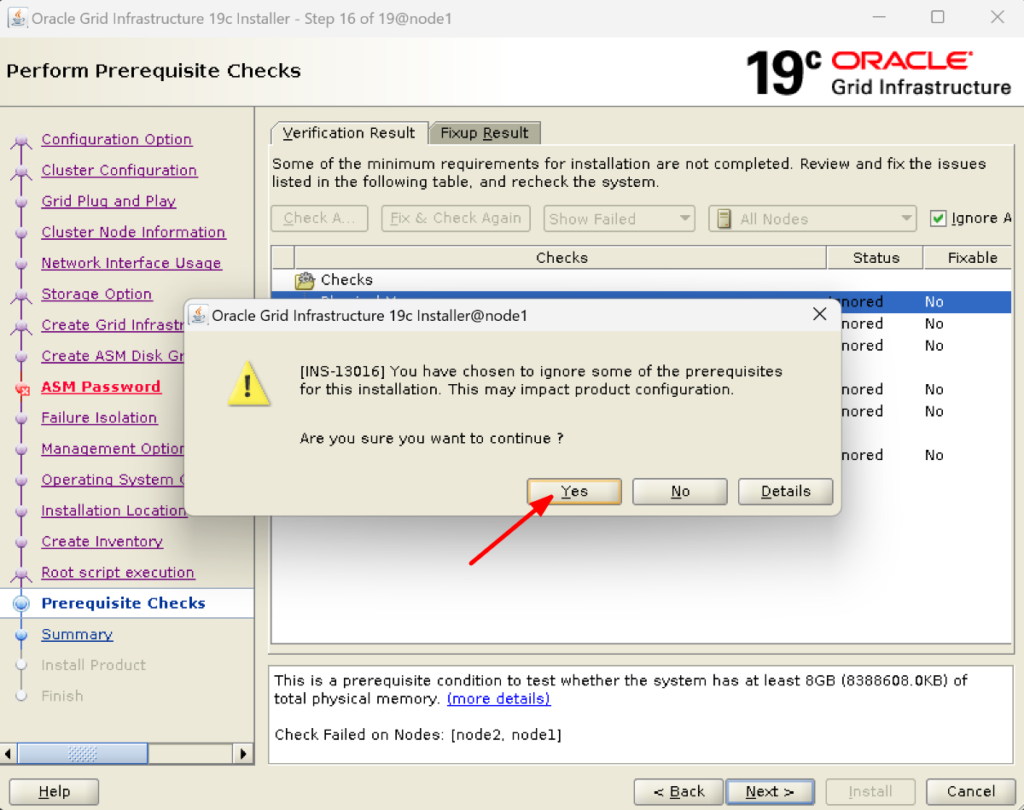

29. Well done reader. It is time to install the grid software.
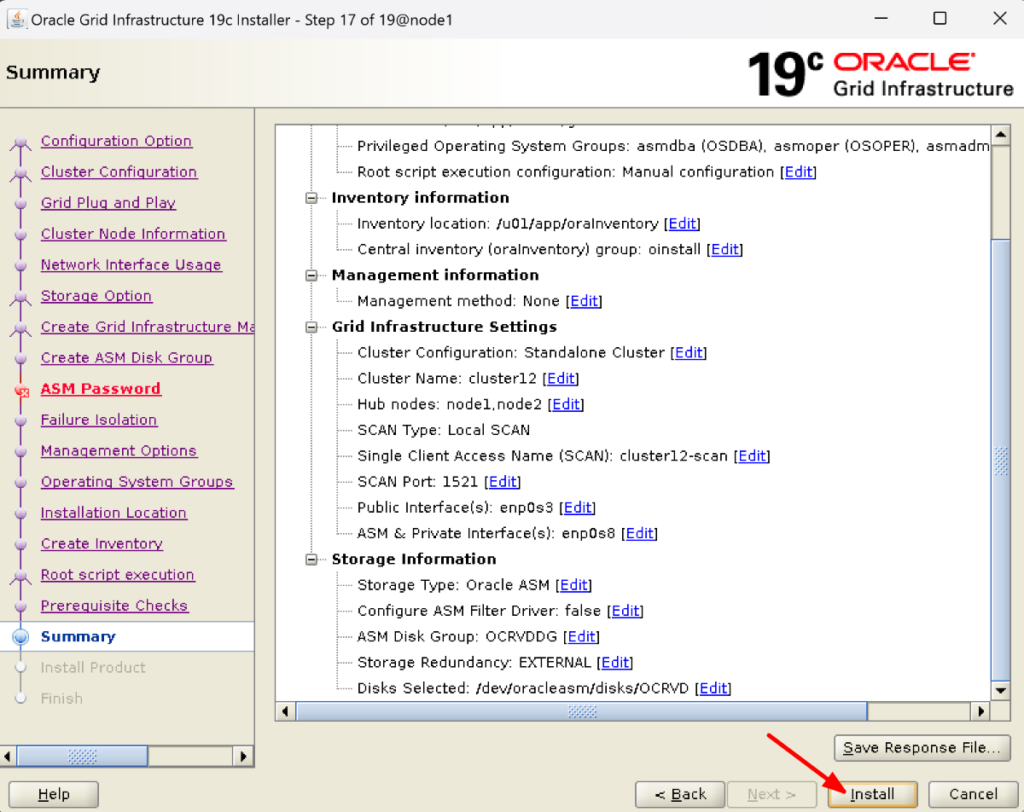

30. Now you have to run two scripts on both the nodes node1 and node2 as root user:
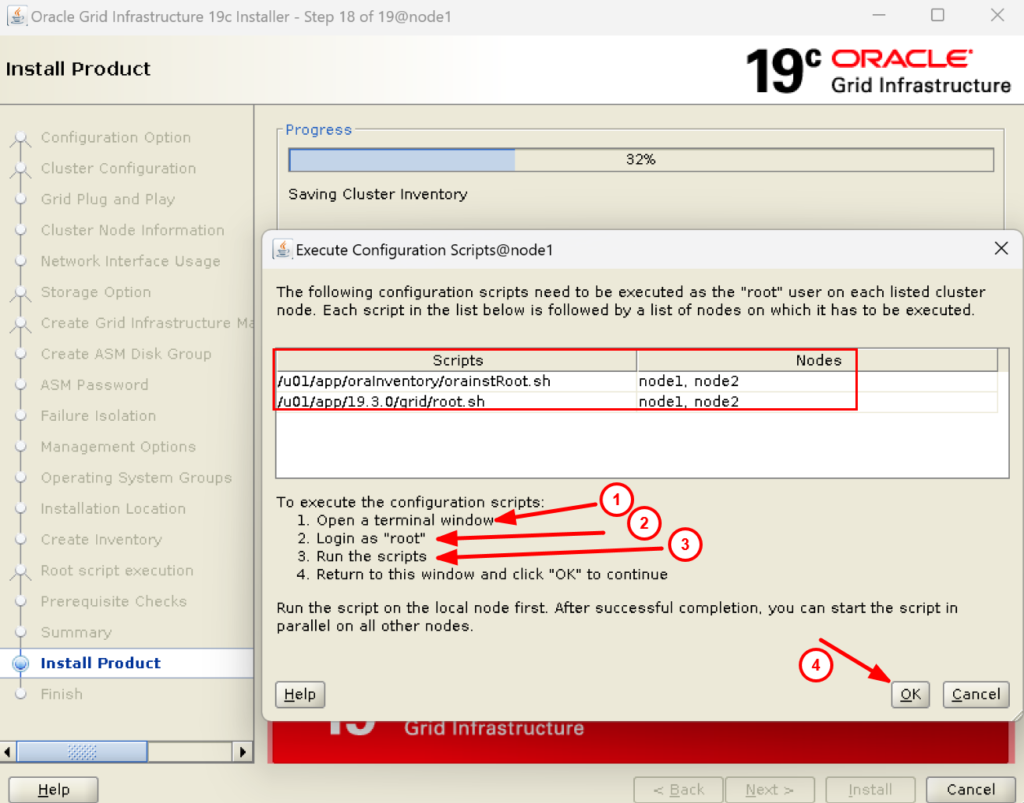

NODE1:
[root@node1 ~]# /u01/app/oraInventory/orainstRoot.sh
Changing permissions of /u01/app/oraInventory.
Adding read,write permissions for group.
Removing read,write,execute permissions for world.

Changing groupname of /u01/app/oraInventory to oinstall.
The execution of the script is complete.

[root@node1 ~]# /u01/app/19.3.0/grid/root.sh
Performing root user operation.
2024/02/17 00:33:43 CLSRSC-325: Configure Oracle Grid Infrastructure for a Cluster ... succeeded
[root@node1 ~]#


NODE2:
[root@node2 ~]# /u01/app/oraInventory/orainstRoot.sh
Changing permissions of /u01/app/oraInventory.
Adding read,write permissions for group.
Removing read,write,execute permissions for world.

Changing groupname of /u01/app/oraInventory to oinstall.
The execution of the script is complete.

[root@node2 ~]# /u01/app/19.3.0/grid/root.sh
Performing root user operation.
2024/02/17 00:42:18 CLSRSC-325: Configure Oracle Grid Infrastructure for a Cluster ... succeeded
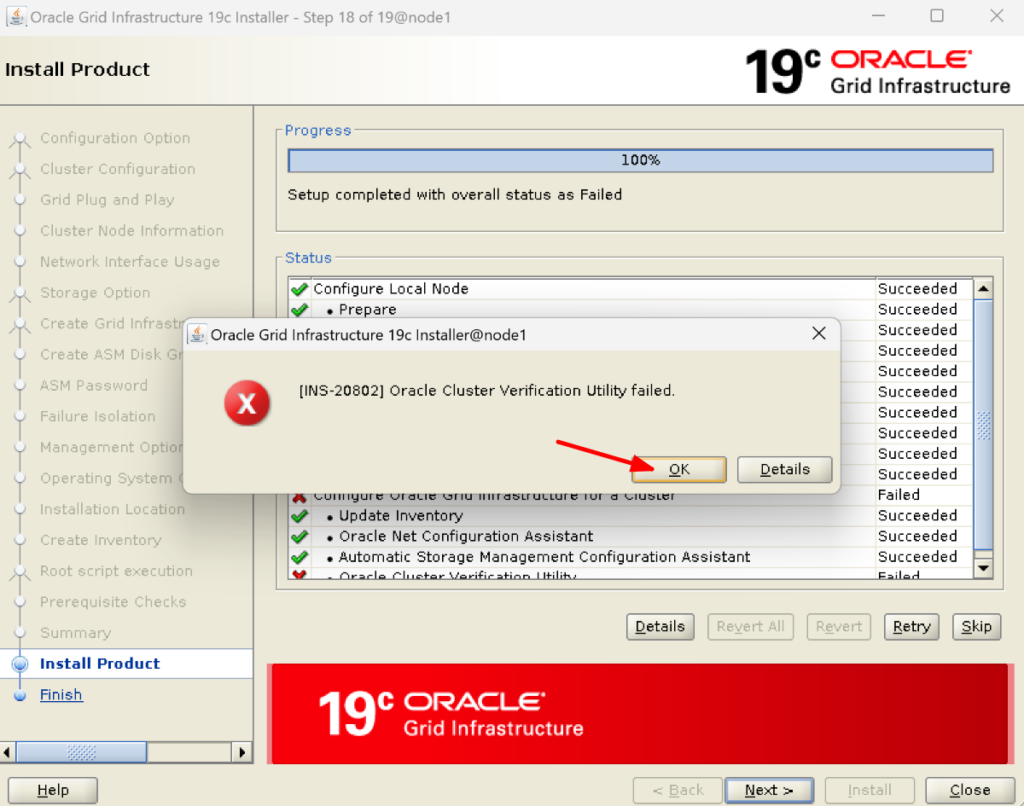
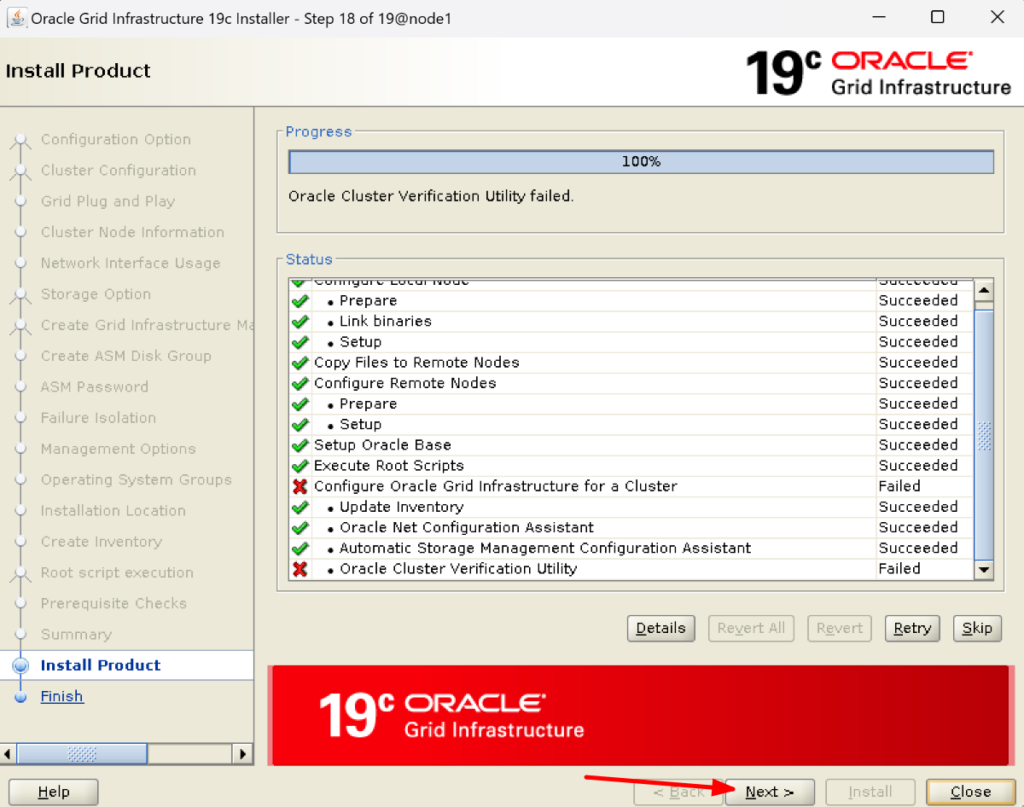
31. You will receive the message Oracle Cluster Verification Utility Failed. Just ignore this message and continue:


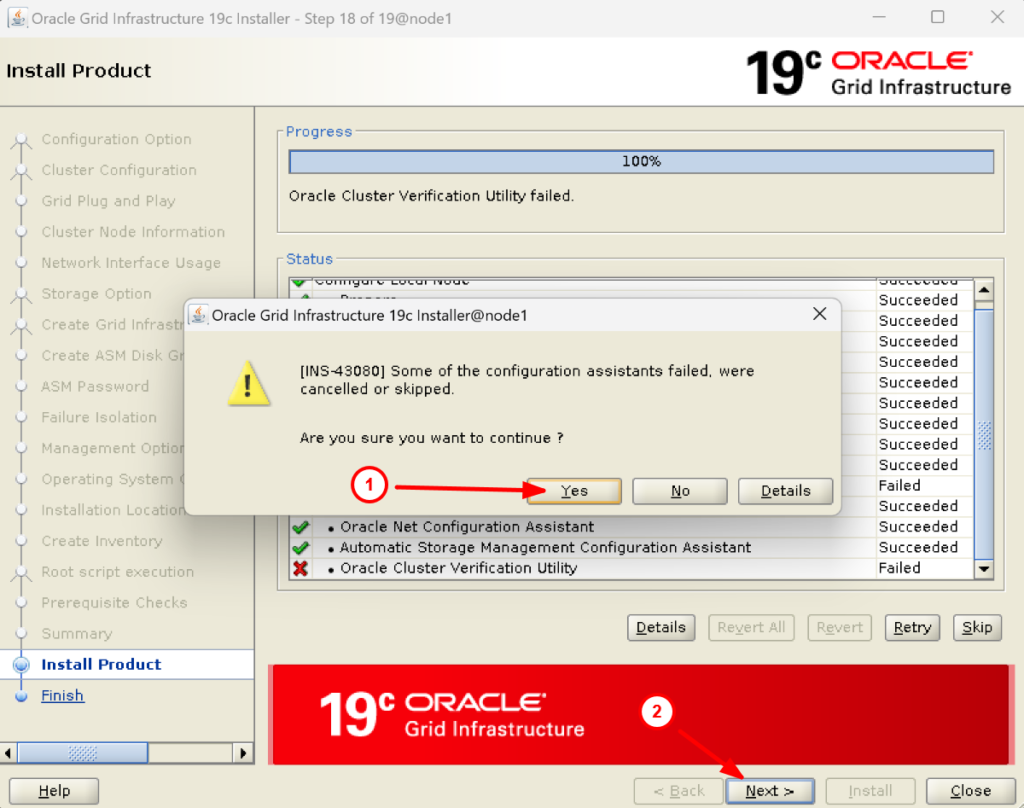

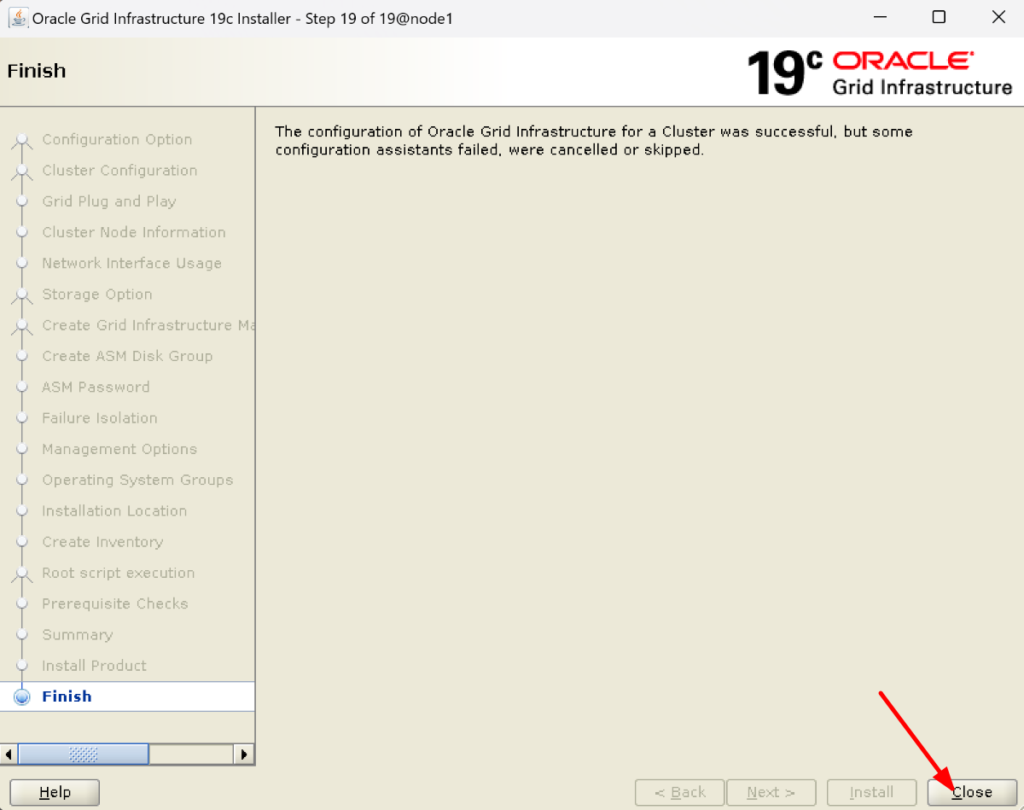

Congratulations! You have completed the 19c grid installation guide.
32. It’s time to verify the cluster now on each node to check if the 19c grid software installation is done properly:
Verify NODE1:
[root@node1 ~]# . oraenv
ORACLE_SID = [root] ? +ASM1
ORACLE_HOME = [/home/oracle] ? /u01/app/19.3.0/grid
The Oracle base has been set to /u01/app/grid

[root@node1 ~]# env|grep ORA
ORACLE_SID=+ASM1
ORACLE_BASE=/u01/app/grid
ORACLE_HOME=/u01/app/19.3.0/grid

[root@node1 ~]# crsctl check crs
CRS-4638: Oracle High Availability Services is online
CRS-4537: Cluster Ready Services is online
CRS-4529: Cluster Synchronization Services is online
CRS-4533: Event Manager is online

[root@node1 ~]# crsctl check cluster -all
**************************************************************
node1:
CRS-4537: Cluster Ready Services is online
CRS-4529: Cluster Synchronization Services is online
CRS-4533: Event Manager is online
**************************************************************
node2:
CRS-4537: Cluster Ready Services is online
CRS-4529: Cluster Synchronization Services is online
CRS-4533: Event Manager is online
**************************************************************
[root@node1 ~]#

VERIFY NODE2:
[root@node2 ~]# . oraenv
ORACLE_SID = [root] ? +ASM2
ORACLE_HOME = [/home/oracle] ? /u01/app/19.3.0/grid/
The Oracle base has been set to /u01/app/grid

[root@node2 ~]# env|grep ORA
ORACLE_SID=+ASM2
ORACLE_BASE=/u01/app/grid
ORACLE_HOME=/u01/app/19.3.0/grid/

[root@node2 ~]# crsctl check crs
CRS-4638: Oracle High Availability Services is online
CRS-4537: Cluster Ready Services is online
CRS-4529: Cluster Synchronization Services is online
CRS-4533: Event Manager is online

[root@node2 ~]# crsctl check cluster -all
**************************************************************
node1:
CRS-4537: Cluster Ready Services is online
CRS-4529: Cluster Synchronization Services is online
CRS-4533: Event Manager is online
**************************************************************
node2:
CRS-4537: Cluster Ready Services is online
CRS-4529: Cluster Synchronization Services is online
CRS-4533: Event Manager is online
**************************************************************
[root@node2 ~]#
I hope you have walked through each step of the 19c grid installation guide and completed the 19c grid software installation.