Please follow the instructions below for Oracle RAC 19c binary installation:
Table of Contents
1. Download the Oracle 19c software from Oracle Database 19c (19.3) for Linux x86-64 on your Windows machine to proceed for the Oracle 19c database software installation in RAC.
2. Now the next step is to copy the downloaded 19c database software from your Windows machine to the server where you want to install the software. In this practice, I have placed the software in the shared location of my Windows machine so that I can access it from the Linux shared location. If you do not know how to create a shared folder then follow my article Create Shared Folder otherwise you can use other software like WinSCP.


3. Log into Putty or MobaXterm and log in to your server as a grid user. After that go to the shared folder location of your Linux machine and unzip the Oracle database 19c software.
[oracle@node1 ~]$ cd /media/sf_Linux
[oracle@node1 sf_Linux]$ ls -ltr
total 5809492
-rwxrwx--- 1 root vboxsf      20684 Mar  3 08:51 oracleasmlib-2.0.15-1.el7.x86_64.rpm
-rwxrwx--- 1 root vboxsf 2889184573 Mar  9 22:06 LINUX.X64_193000_grid_home.zip
-rwxrwx--- 1 root vboxsf 3059705302 Mar  9 22:08 LINUX.X64_193000_db_home.zip

[oracle@node1 sf_Linux]$ unzip LINUX.X64_193000_db_home.zip -d /u01/app/oracle/product/19.3.0/dbhome_1/
4. Passwordless SSH setup for Oracle user so that Oracle user can log in to the other nodes without any password:
[oracle@node1 ~]$ cd /u01/app/19.3.0/grid/deinstall

[oracle@node1 deinstall]$ ./sshUserSetup.sh -user oracle -hosts "node1 node2" -noPromptPassphrase -confirm -advanced

#####Provide the oracle user password for both the nodes when asked####

The output of this script is also logged into /tmp/sshUserSetup_2024-02-17-09-53-48.log
-Verification from complete-
SSH verification complete.  ----------> You will get this message
[oracle@node1 deinstall]$
5. Open MobaXterm and run the runInstaller script to follow the Oracle 19c binary installation step-by-step guide:
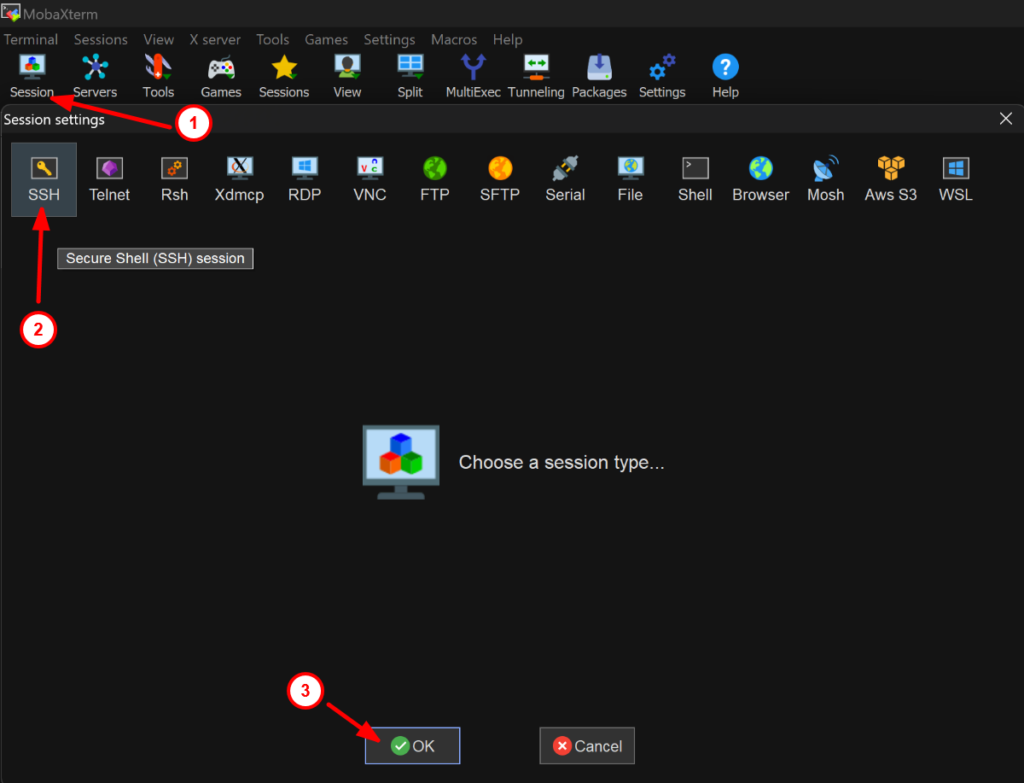

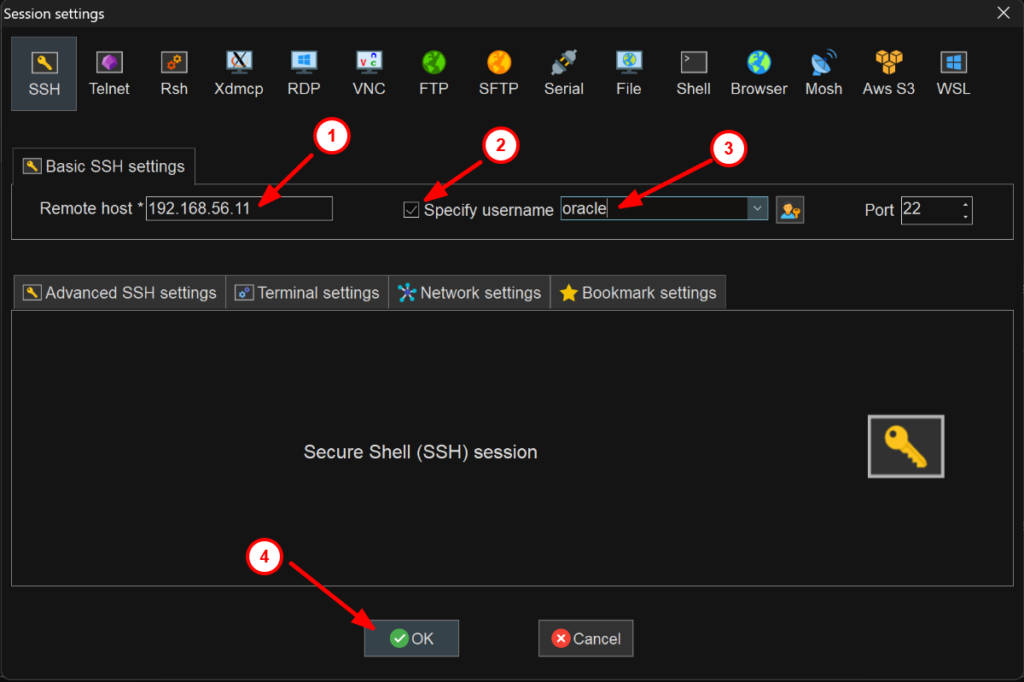

[oracle@node1 ~]$ cd /u01/app/oracle/product/19.3.0/dbhome_1/
[oracle@node1 dbhome_1]$ ./runInstaller
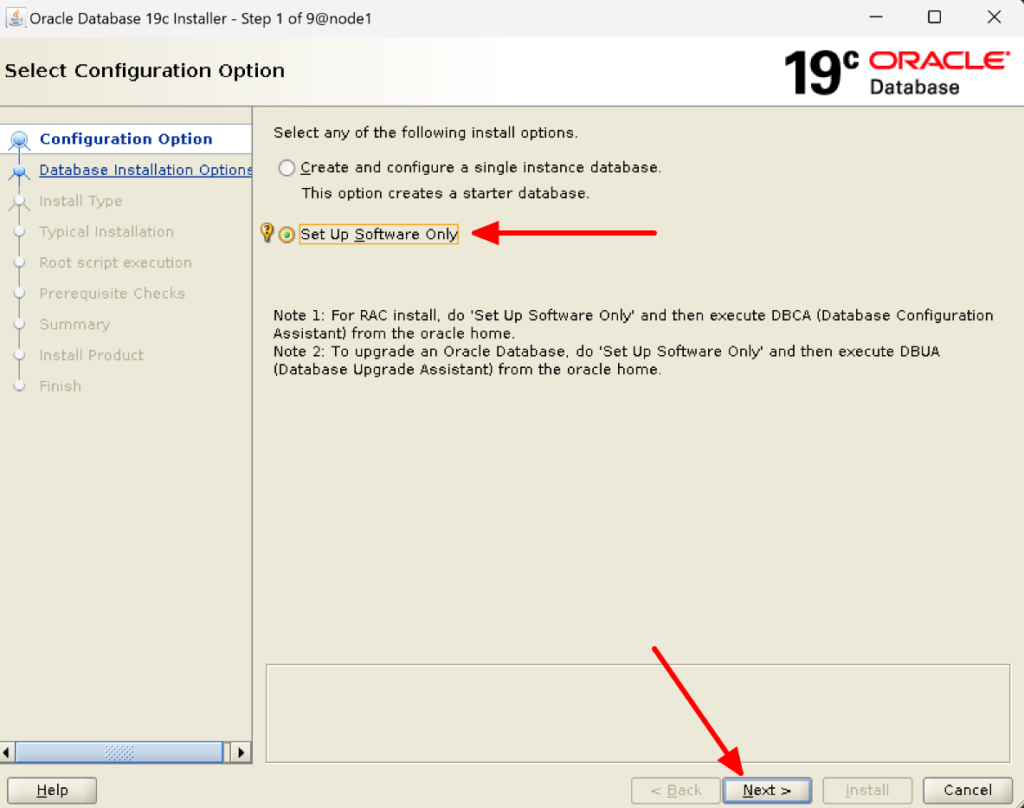
6. It will open a new GUI window. Select set up software only and click on Next:

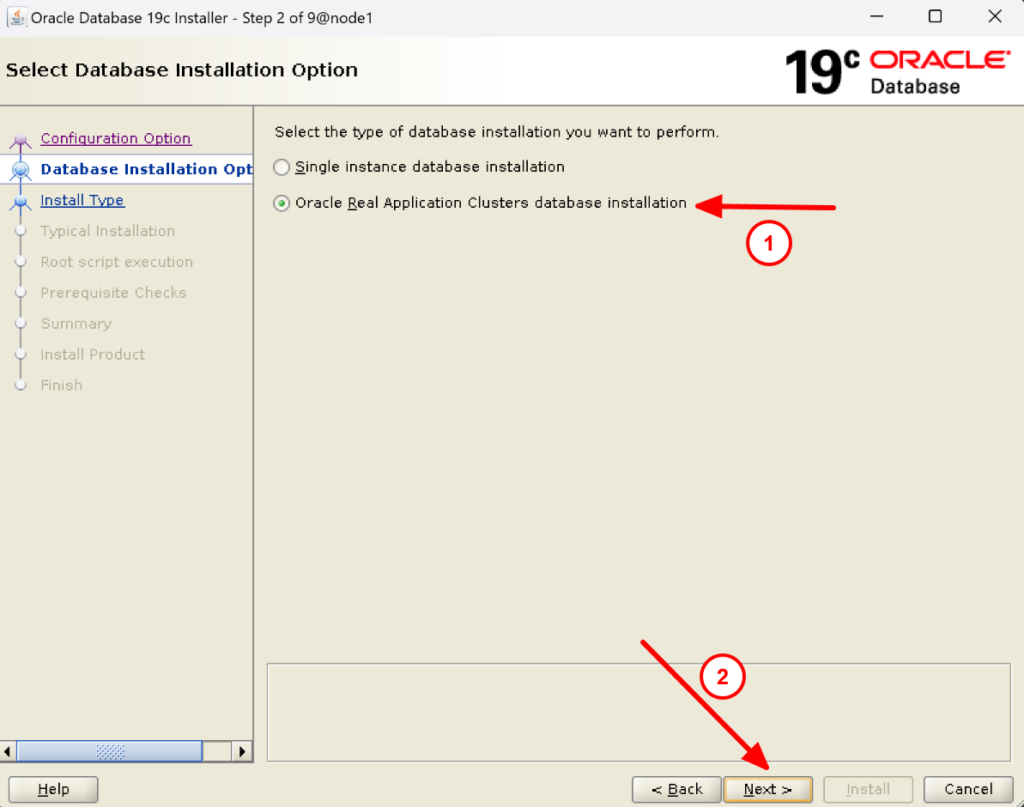
7. Select Oracle real application clusters database installation:

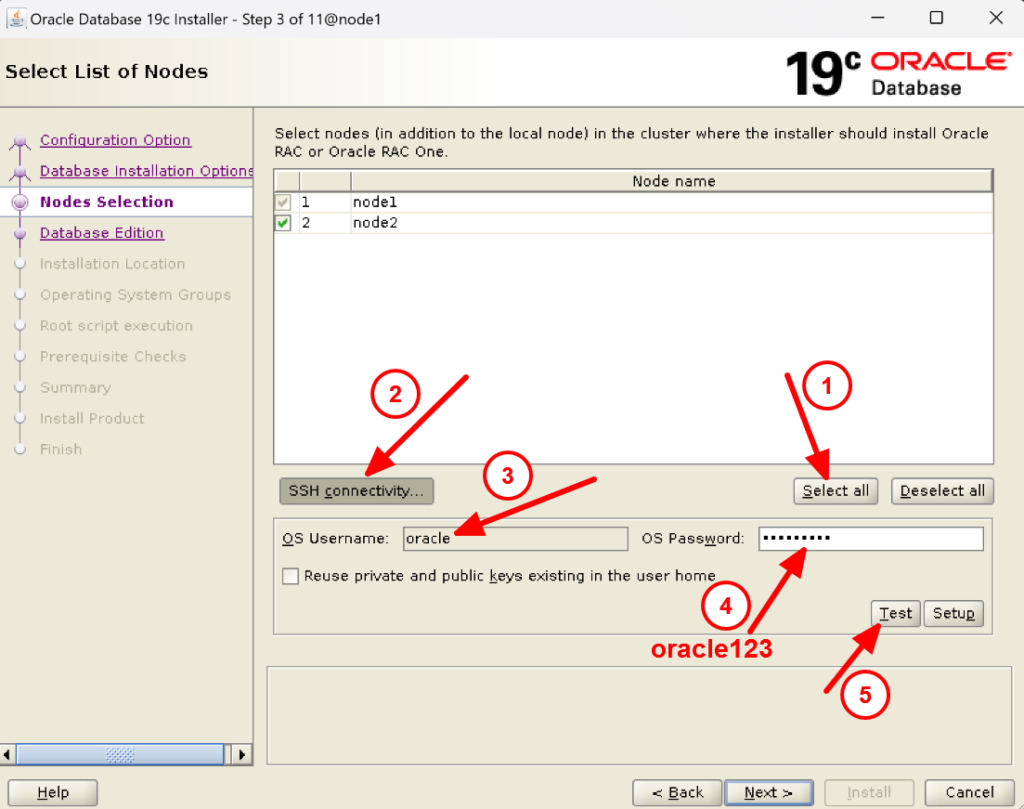
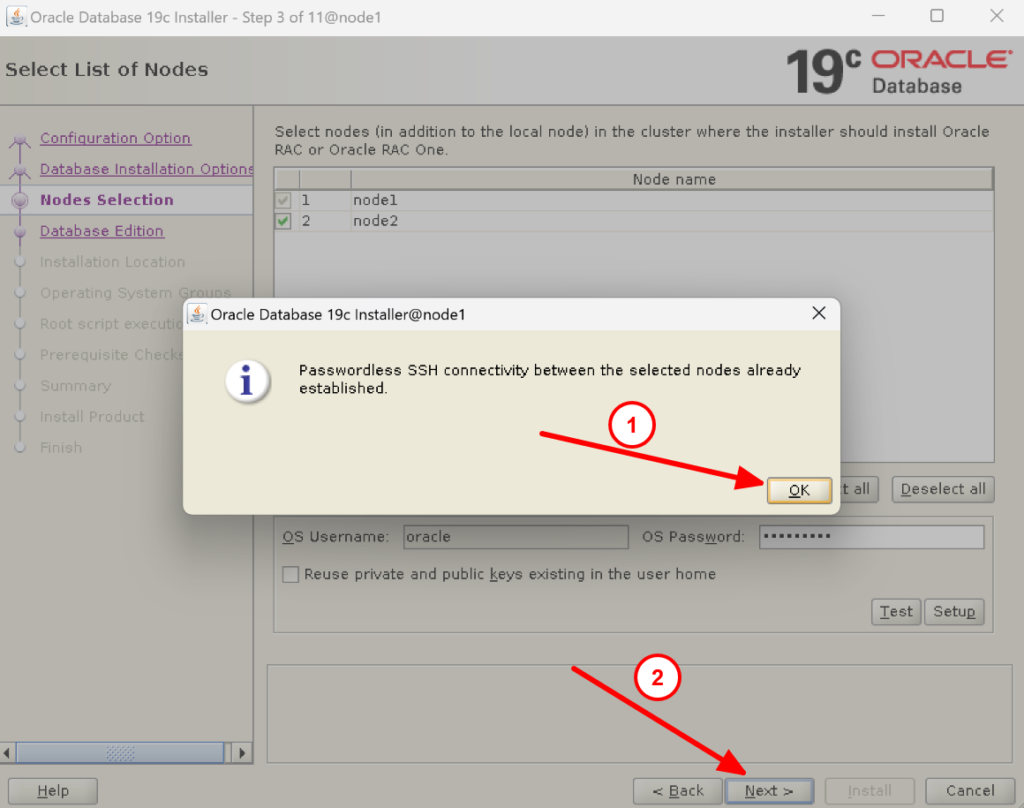
8. Now we have to check SSH connectivity between the nodes node1 and node2.To do that select all nodes, click on SSH connectivity, provide the Oracle user password, and click on test. You will receive a message that the passwordless SSH connectivity between the selected nodes is already established as we already have done in step 4. If you have not done so, you can click on setup to set it up.


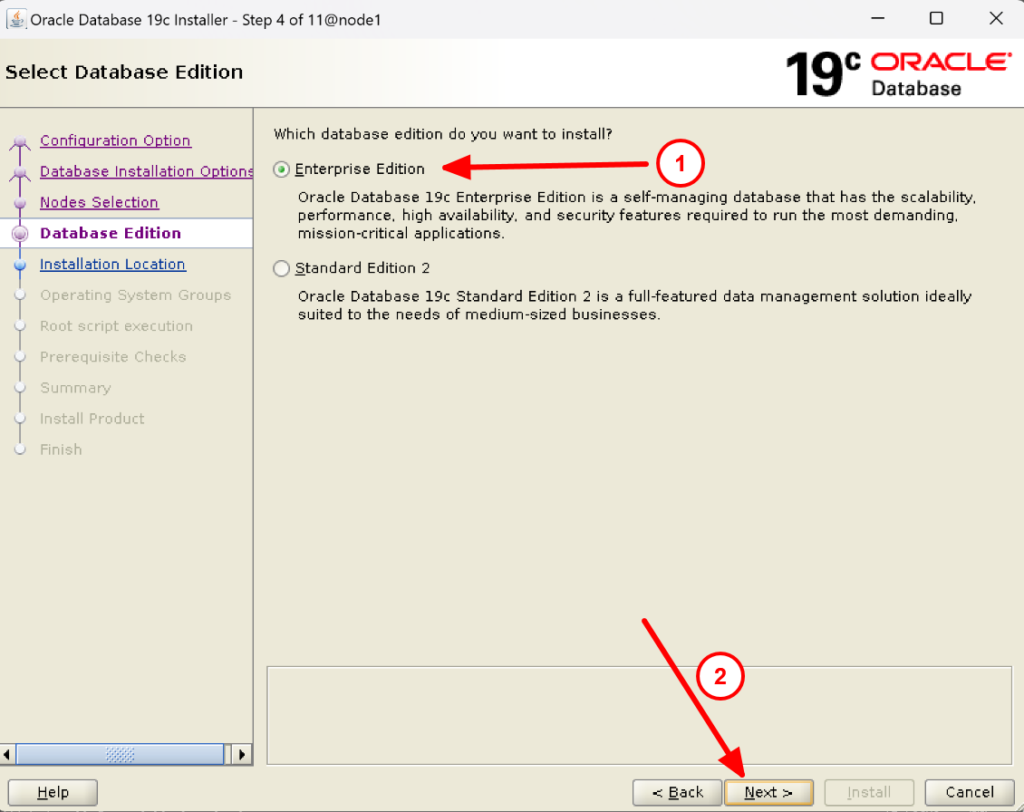
9. Select Enterprise edition and click on Next:

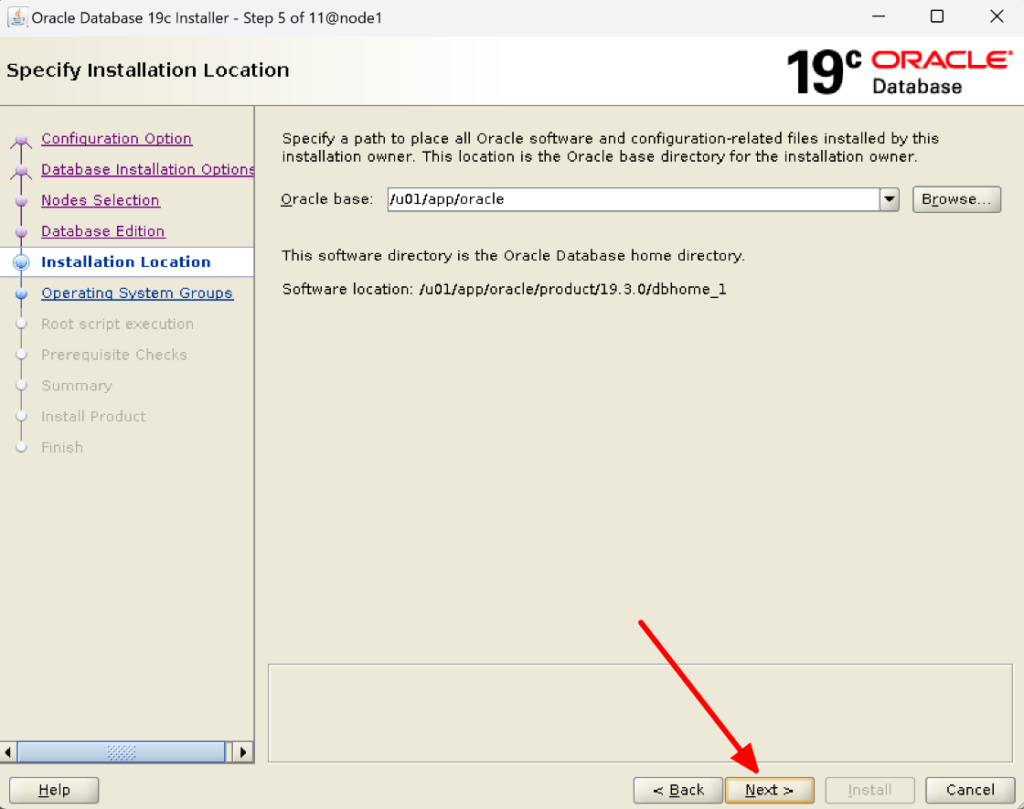
10. Crosscheck the Oracle base and click on next:

11. Check the groups and click on next:
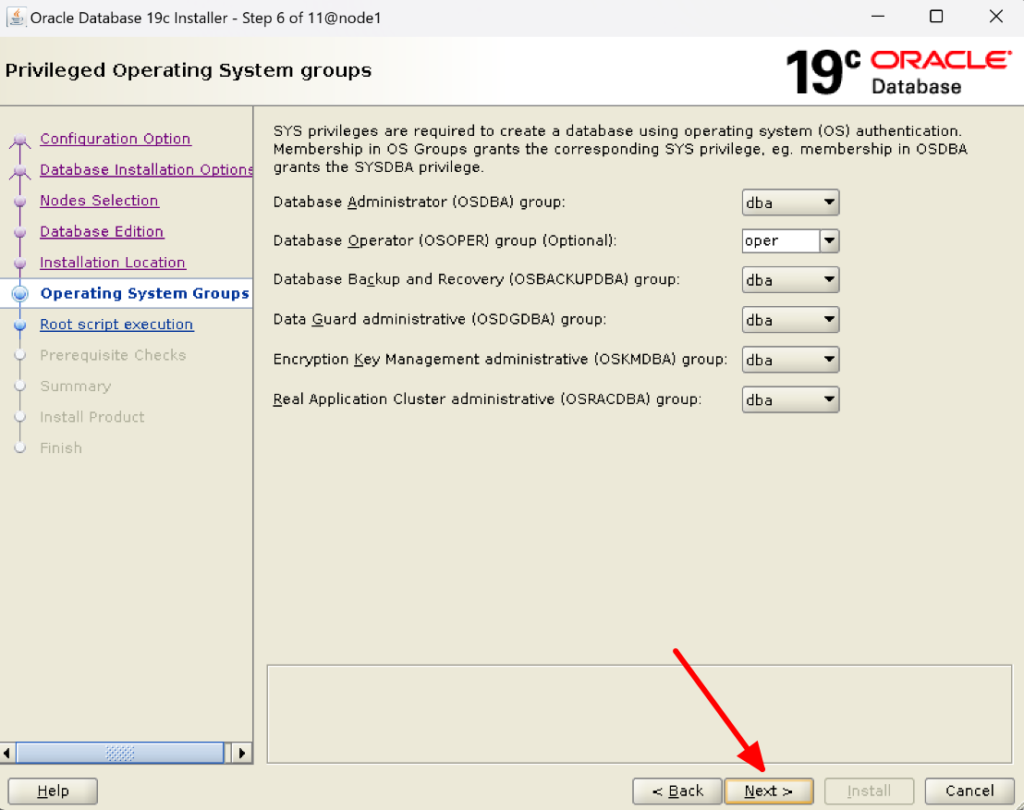

12. Click on Next:
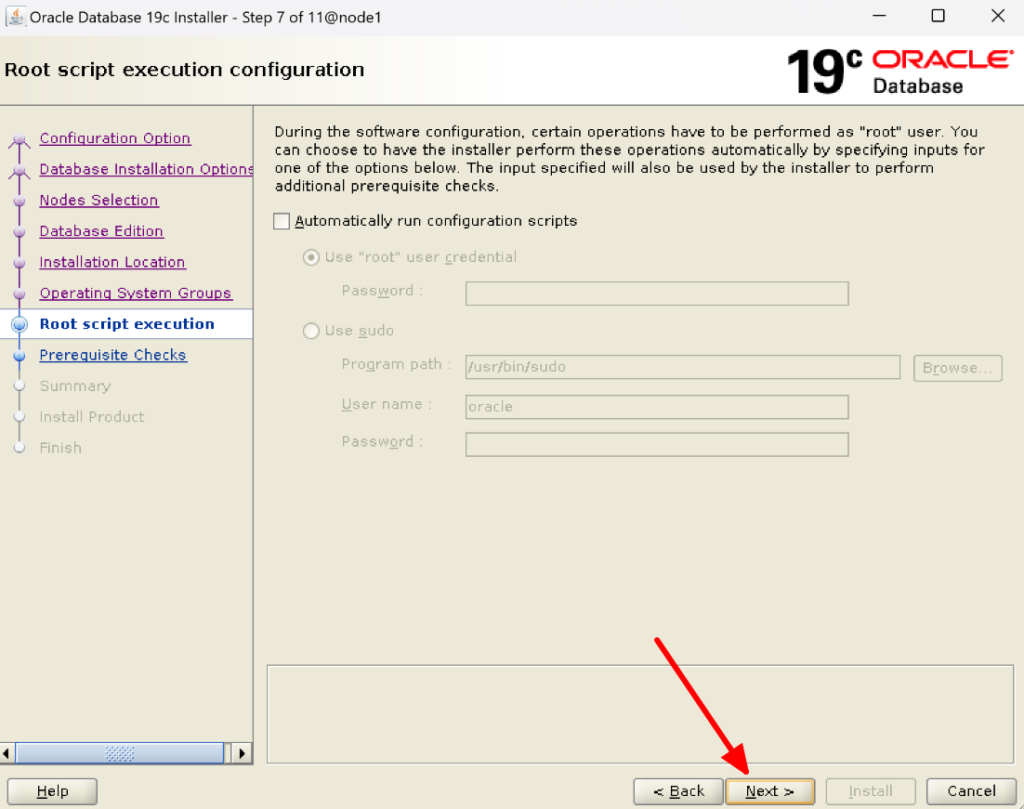

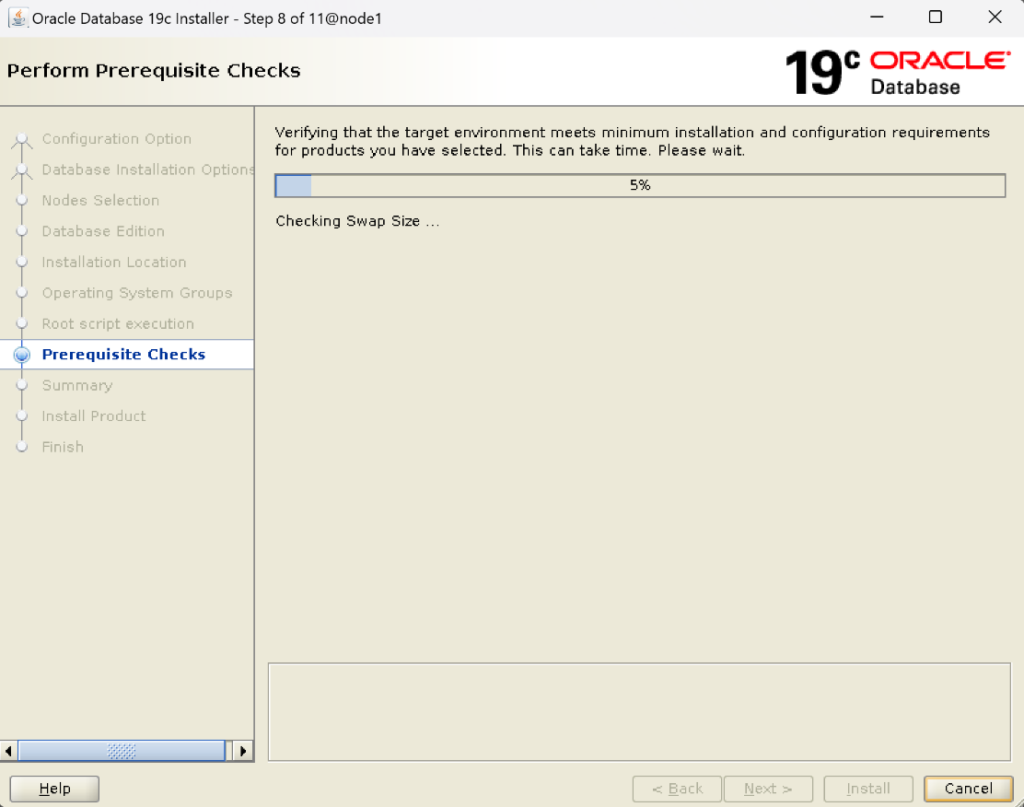

13. Now check if is there anything fixable in the last column then click on Fix & Check Again. It will ask you to run a fixup script in both nodes:
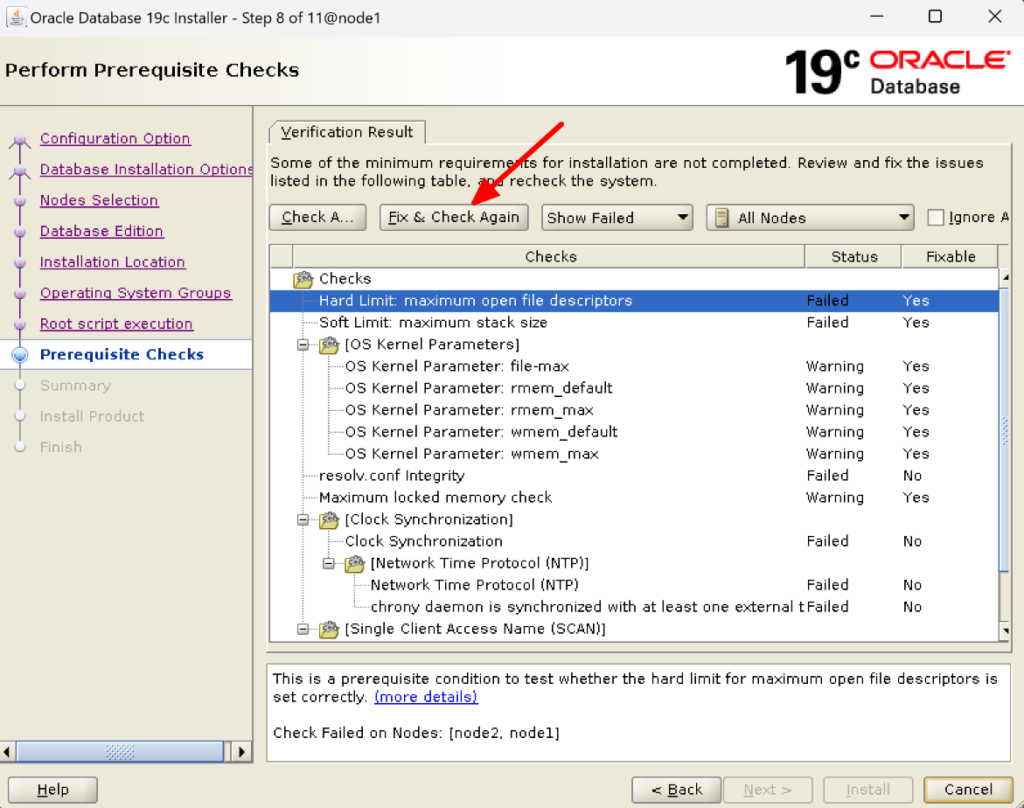

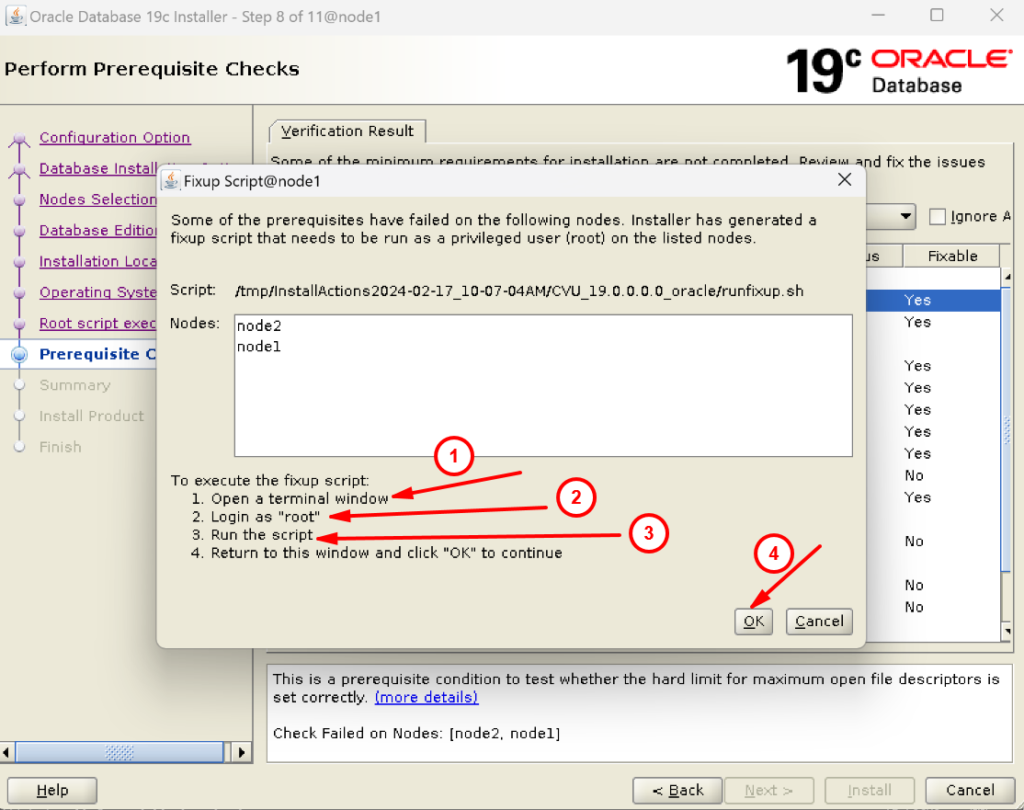

[root@node1 ~]# /tmp/InstallActions2024-02-17_10-07-04AM/CVU_19.0.0.0.0_oracle/runfixup.sh
All Fix-up operations were completed successfully.
[root@node1 ~]#

[root@node2 ~]# /tmp/InstallActions2024-02-17_10-07-04AM/CVU_19.0.0.0.0_oracle/runfixup.sh
All Fix-up operations were completed successfully.
[root@node2 ~]#
14. Once done click on check again. You will see there is nothing in the Fixable section.
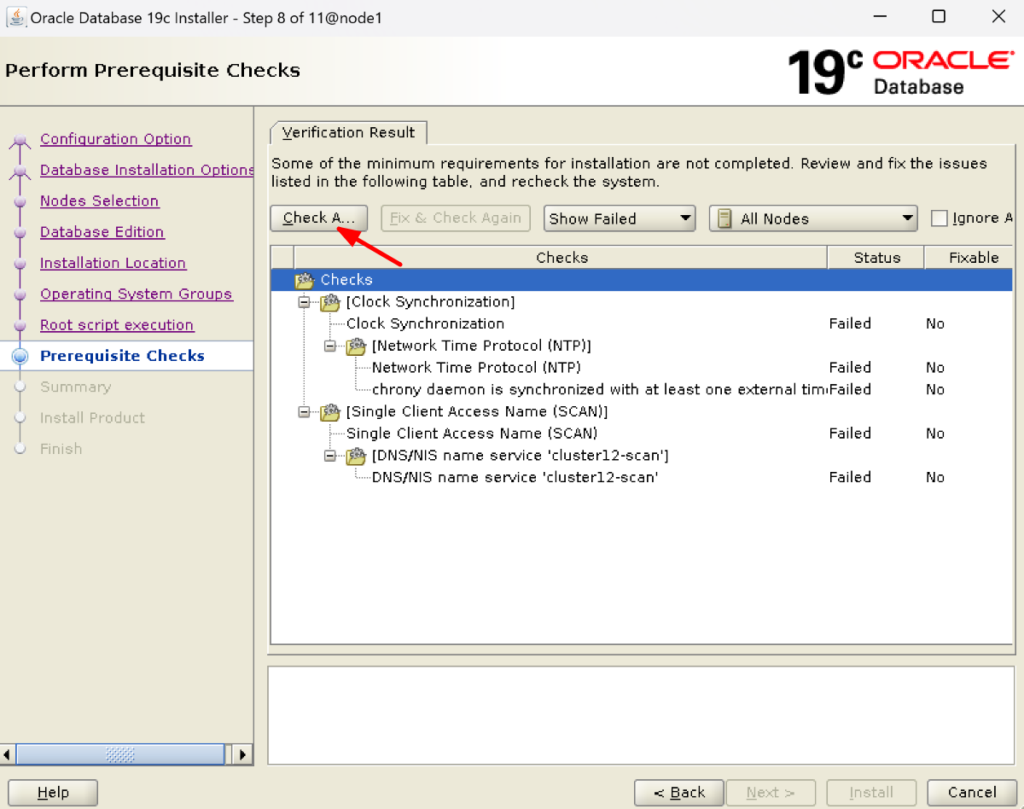

15. Here we can see NTP and DNS/NIS failed but we can ignore them by clicking on the Ignore All box:
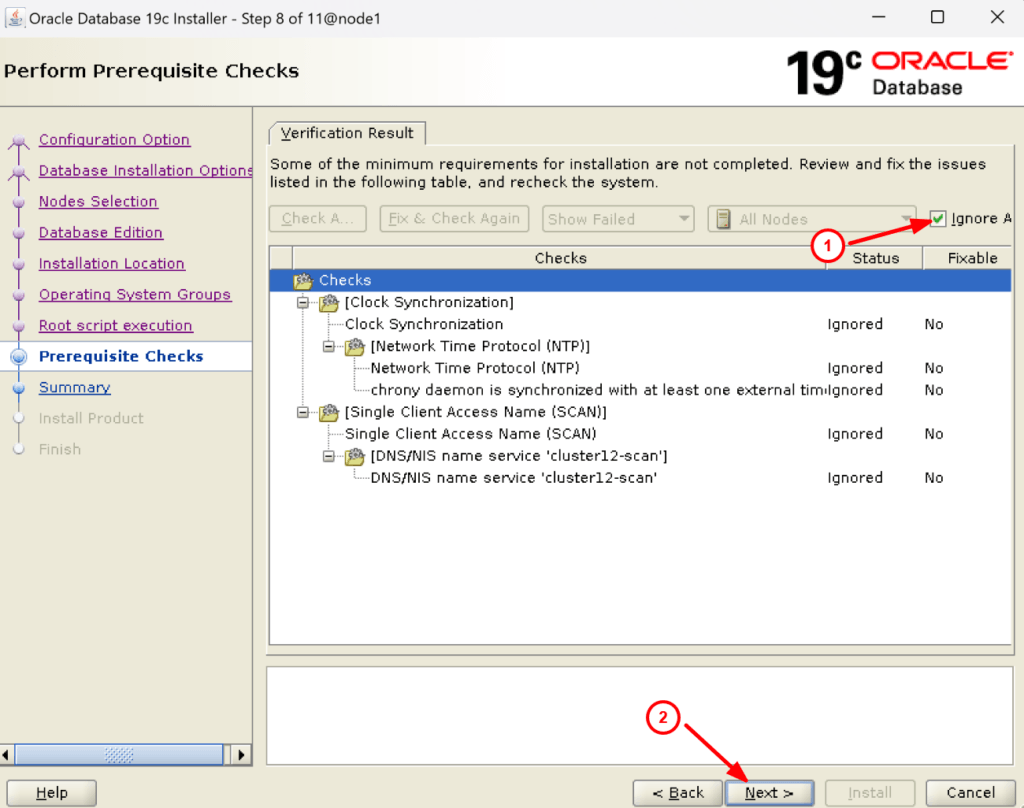

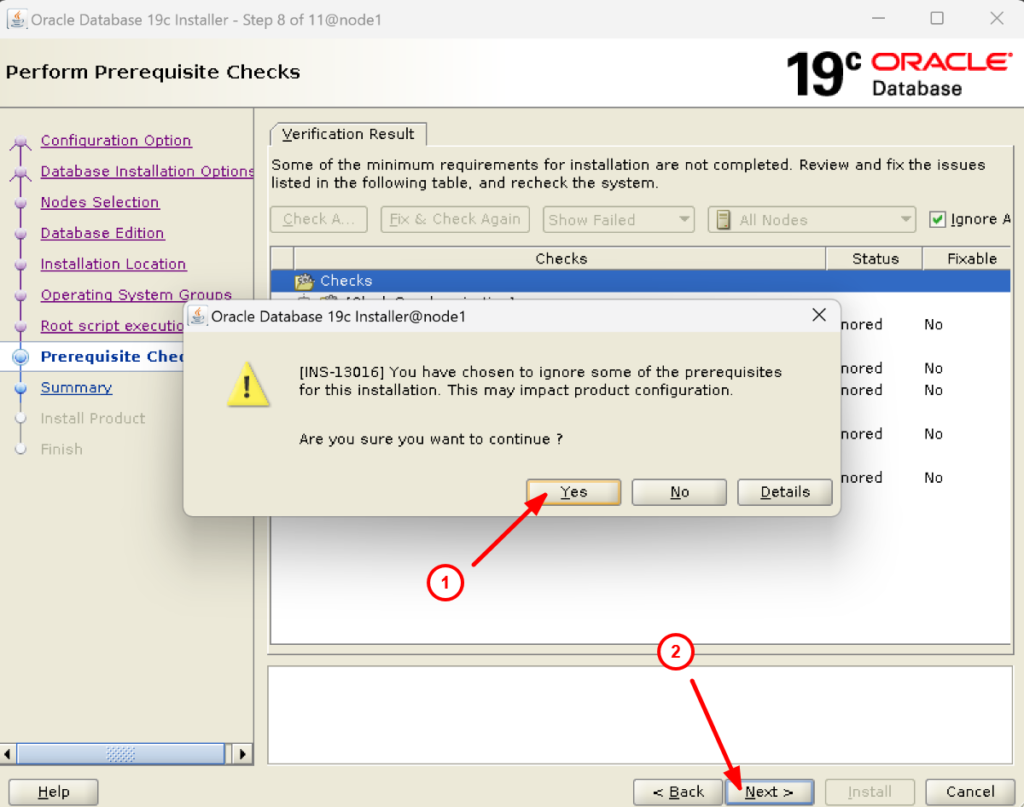

16. Well done reader. It is time to install the Oracle RAC19c software:
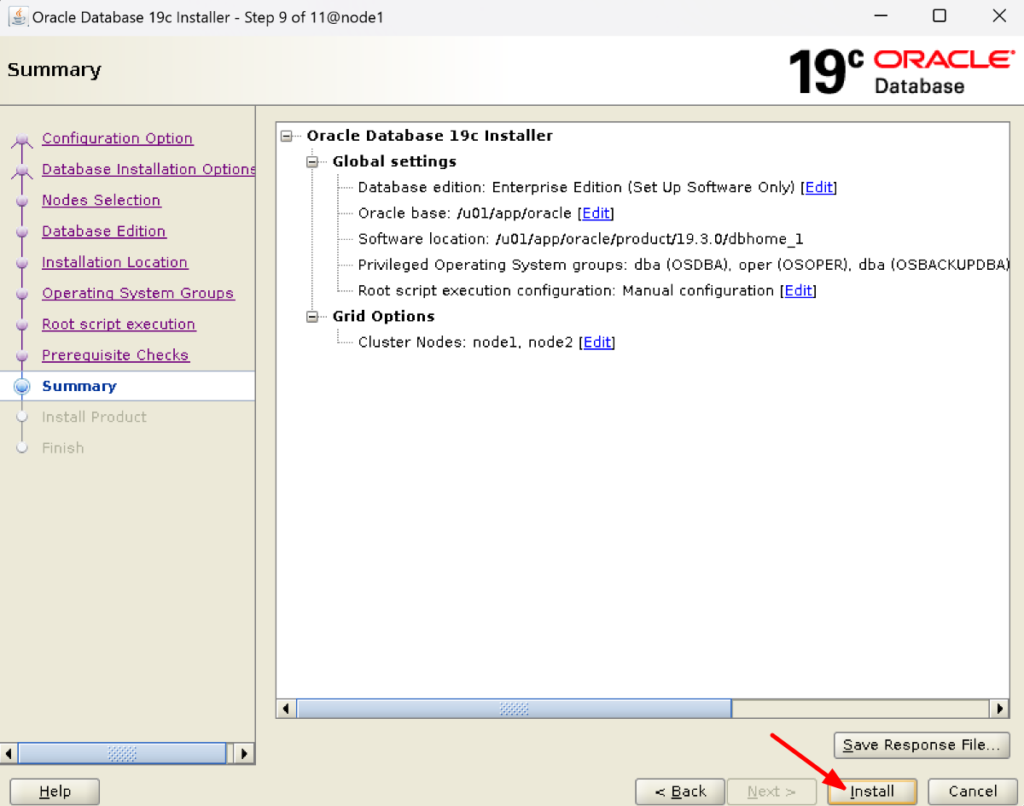

17. Now you have to run root.sh scripts on both the nodes node1 and node2 as root user:
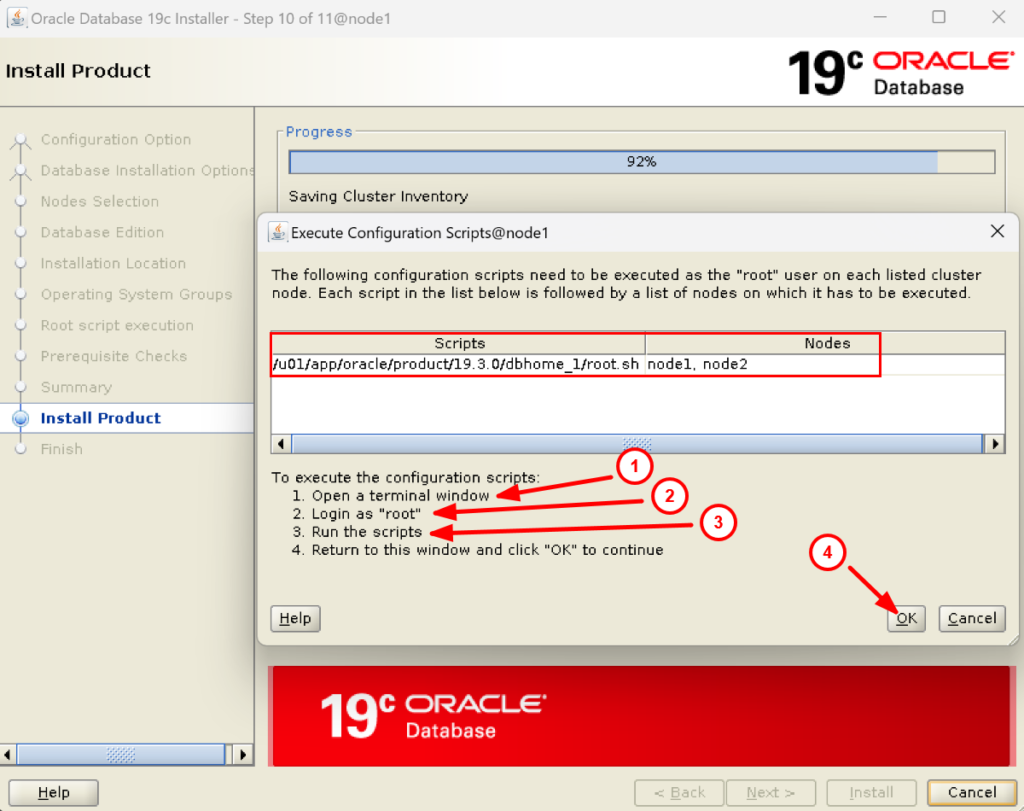

NODE1:
[root@node1 ~]# /u01/app/oracle/product/19.3.0/dbhome_1/root.sh
Performing root user operation.

The following environment variables are set as:
    ORACLE_OWNER= oracle
    ORACLE_HOME=  /u01/app/oracle/product/19.3.0/dbhome_1

Enter the full pathname of the local bin directory: [/usr/local/bin]:
The contents of "dbhome" have not changed. No need to overwrite.
The contents of "oraenv" have not changed. No need to overwrite.
The contents of "coraenv" have not changed. No need to overwrite.

Entries will be added to the /etc/oratab file as needed by
Database Configuration Assistant when a database is created
Finished running generic part of root script.
Now product-specific root actions will be performed.
[root@node1 ~]#

NODE2:
[root@node2 ~]# /u01/app/oracle/product/19.3.0/dbhome_1/root.sh
Performing root user operation.

The following environment variables are set as:
    ORACLE_OWNER= oracle
    ORACLE_HOME=  /u01/app/oracle/product/19.3.0/dbhome_1

Enter the full pathname of the local bin directory: [/usr/local/bin]:
The contents of "dbhome" have not changed. No need to overwrite.
The contents of "oraenv" have not changed. No need to overwrite.
The contents of "coraenv" have not changed. No need to overwrite.

Entries will be added to the /etc/oratab file as needed by
Database Configuration Assistant when a database is created
Finished running generic part of root script.
Now product-specific root actions will be performed.
[root@node2 ~]#
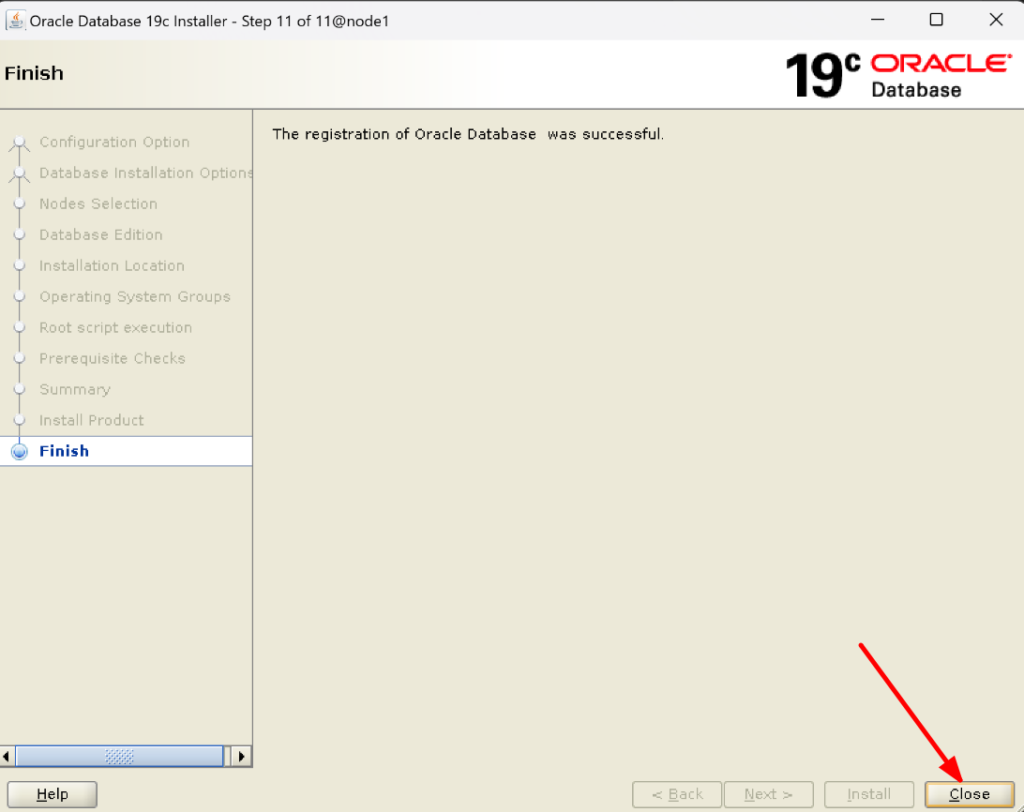
18. You will receive a message that the registration of the Oracle database was successful. Click on Close.

19. It’s time to verify the Oracle Home now on each node to check if the 19c RAC software installation is done properly:
NODE1:

[root@node1 ~]# cat /etc/oraInst.loc
inventory_loc=/u01/app/oraInventory
inst_group=oinstall
[root@node1 ~]# cd /u01/app/oraInventory
[root@node1 oraInventory]# ls -ltr
total 12
-rwxrwx--- 1 grid oinstall 1617 Feb 17 00:05 orainstRoot.sh
-rw-rw---- 1 grid oinstall   56 Feb 17 00:05 oraInst.loc
drwxrwx--- 4 grid oinstall 4096 Feb 17 10:56 logs
drwxrwx--- 4 grid oinstall   64 Feb 17 10:57 backup
drwxrwx--- 2 grid oinstall   81 Feb 17 10:57 ContentsXML
[root@node1 oraInventory]# cd ContentsXML
[root@node1 ContentsXML]# ls -ltr
total 16
-rw-rw---- 1 grid oinstall 561 Feb 17 10:57 inventory.xml
-rw-rw---- 1 grid oinstall 174 Feb 17 10:57 oui-patch.xml
-rw-rw---- 1 grid oinstall 300 Feb 17 11:04 comps.xml
-rw-rw---- 1 grid oinstall 292 Feb 17 11:04 libs.xml
[root@node1 ContentsXML]# cat inventory.xml
<?xml version="1.0" standalone="yes" ?>
<!-- Copyright (c) 1999, 2024, Oracle and/or its affiliates.
All rights reserved. -->
<!-- Do not modify the contents of this file by hand. -->
<INVENTORY>
<VERSION_INFO>
   <SAVED_WITH>12.2.0.7.0</SAVED_WITH>
   <MINIMUM_VER>2.1.0.6.0</MINIMUM_VER>
</VERSION_INFO>
<HOME_LIST>
<HOME NAME="OraGI19Home1" LOC="/u01/app/19.3.0/grid" TYPE="O" IDX="1" CRS="true"/>
<HOME NAME="OraDB19Home1" LOC="/u01/app/oracle/product/19.3.0/dbhome_1" TYPE="O" IDX="2"/>
</HOME_LIST>
<COMPOSITEHOME_LIST>
</COMPOSITEHOME_LIST>
</INVENTORY>
[root@node1 ContentsXML]#

NODE2:

[root@node2 ~]# cat /etc/oraInst.loc
inventory_loc=/u01/app/oraInventory
inst_group=oinstall
[root@node2 ~]# cd /u01/app/oraInventory
[root@node2 oraInventory]# ls -ltr
total 12
-rwxrwx--- 1 grid oinstall 1617 Feb 17 00:08 orainstRoot.sh
-rw-rw---- 1 grid oinstall   56 Feb 17 00:08 oraInst.loc
drwxrwx--- 2 grid oinstall   60 Feb 17 00:08 ContentsXML
drwxrwx--- 3 grid oinstall   35 Feb 17 00:43 backup
drwxrwx--- 2 grid oinstall 4096 Feb 17 11:04 logs
[root@node2 oraInventory]# cd ContentsXML
[root@node2 ContentsXML]# ls -ltr
total 12
-rw-rw---- 1 grid oinstall 561 Feb 17 11:04 inventory.xml
-rw-rw---- 1 grid oinstall 300 Feb 17 11:04 comps.xml
-rw-rw---- 1 grid oinstall 292 Feb 17 11:04 libs.xml
[root@node2 ContentsXML]# cat inventory.xml
<?xml version="1.0" standalone="yes" ?>
<!-- Copyright (c) 1999, 2024, Oracle and/or its affiliates.
All rights reserved. -->
<!-- Do not modify the contents of this file by hand. -->
<INVENTORY>
<VERSION_INFO>
   <SAVED_WITH>12.2.0.7.0</SAVED_WITH>
   <MINIMUM_VER>2.1.0.6.0</MINIMUM_VER>
</VERSION_INFO>
<HOME_LIST>
<HOME NAME="OraGI19Home1" LOC="/u01/app/19.3.0/grid" TYPE="O" IDX="1" CRS="true"/>
<HOME NAME="OraDB19Home1" LOC="/u01/app/oracle/product/19.3.0/dbhome_1" TYPE="O" IDX="2"/>
</HOME_LIST>
<COMPOSITEHOME_LIST>
</COMPOSITEHOME_LIST>
</INVENTORY>
[root@node2 ContentsXML]#
Congratulations! Oracle RAC 19c binary installation in RAC is completed successfully.